

8 Fixes for 3D Print Under-Extrusion & Gaps: Causes & Pro Tips
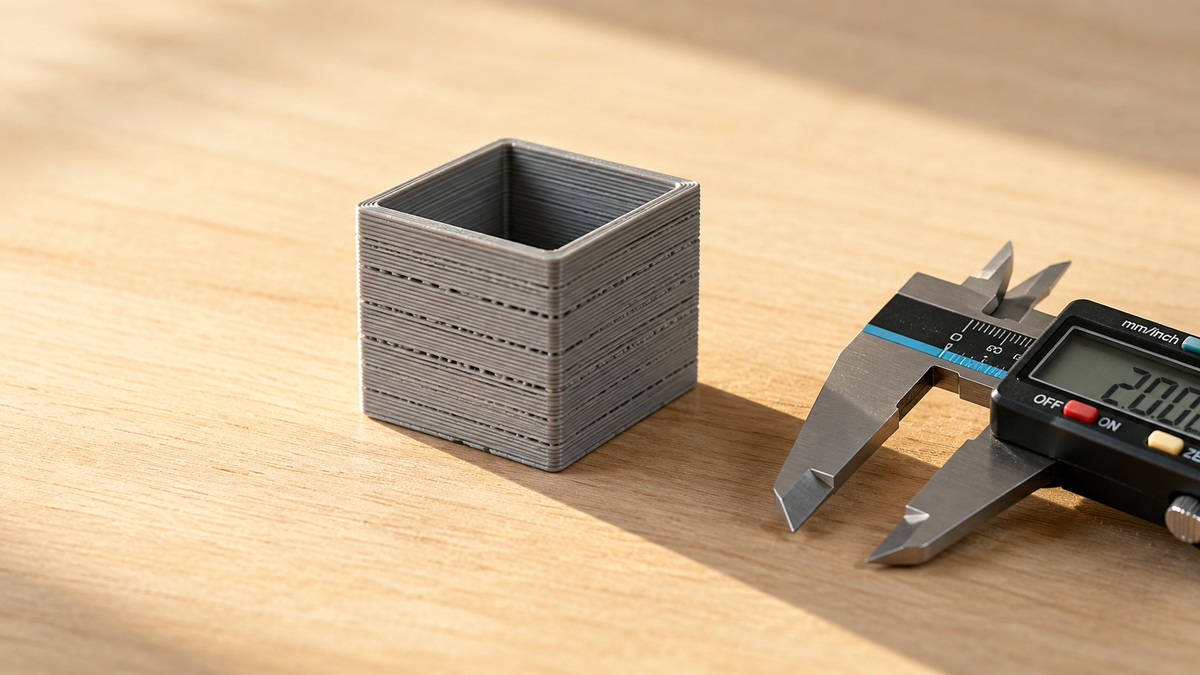
A print that looks starved of plastic is telling you something specific. Lines stop touching each other. Walls go thin. Whole sections of a layer seem to skip. The part still finishes, and it still snaps far too easily when you flex it.
Under-extrusion occurs when actual material delivery falls below the extrusion commanded by a valid toolpath. Before diagnosing hardware, confirm in the slicer preview that the model, wall count, infill, top layers, line width, and first-layer settings actually call for material in the affected area.
So the fastest route to a fix is not a longer checklist. It is one question. When did the gaps appear?
Quick pick: match the pattern, then start there
|
What you see |
Most likely cause |
Start here |
|
Only layer one is thin or broken |
Nozzle sitting too close to the bed |
Raise the Z-offset slightly, then reprint the same test |
|
A short gap after every travel move |
Retraction pulling back too far |
Cut retraction distance in small steps |
|
Good for an hour, then gaps appear |
Heat creep, a tangled spool, or a forming clog |
Listen for clicking, then check the spool and gear |
|
Thin everywhere, top to bottom |
Low temperature, wrong diameter, or a partial clog |
Clean the nozzle before you touch flow |
|
Fast infill fails, slow walls look fine |
Asking for more melt per second than the hot end can deliver |
Drop print speed and reprint |
|
It printed fine yesterday, not today |
Something physical changed |
Inspect the nozzle, gear, and tube. Leave flow alone. |
What Under-Extrusion Actually Looks Like

Backlighting can reveal unexpected gaps, but it does not identify their cause. Compare the wall with the slicer preview, measure a suitable calibration print, and inspect whether individual lines are consistently narrower or missing before calling it under-extrusion.
Gaps, Thin Walls, and Missing Layers
The most useful clue is line consistency. A healthy extrusion line looks even along its whole length. An under-extruded line alternates: normal, then thin, then briefly absent, then normal again. That flicker is diagnostic.
Strength drops with it. Neighbouring lines and layers have less plastic bonding them, so a part that measures correctly can still break under light load. Parents notice this first when a printed toy car loses a wheel mount on day two. Dimensions can still measure fine.
Under-Extrusion vs Over-Extrusion vs No Extrusion
These three defects need opposite responses, and treating one like another makes things worse. Raising flow on a genuine over-extrusion problem, for example, turns a rough surface into a dimensional mess. Diagnose before you dial.
|
Issue |
What you see |
Typical cause |
Correct first move |
|
Under-extrusion |
Gaps, thin walls, weak layers, sparse infill |
Partial clog, low temperature, slipping gear, speed too high |
Clear the flow path, then adjust heat or speed |
|
Over-extrusion |
Blobs, rough walls, oversized dimensions, stringing |
Flow set too high, temperature too high, wrong diameter entered |
Lower flow in small steps, then check diameter |
|
No extrusion |
Nothing leaves the nozzle. Clicking or grinding. |
Full clog, stripped filament, feeder or motor fault |
Stop the print. Check the filament path and the nozzle. |
|
Tip Under-extrusion still produces plastic. That is what separates it from a full blockage, and it is also what makes it easy to misread as a settings problem. |
Diagnose It by When It Happens

Timing narrows the field faster than appearance does. Four patterns cover almost every case. Find yours first.
First Layer Only
If layer one looks scraped or transparent and everything above it prints cleanly, the bed is part of the problem. A nozzle parked too close leaves no room for molten plastic to escape, so the build surface partly seals the opening. Extrusion improves the moment the printer climbs away from the plate.
Low first-layer temperature and high first-layer speed both make it worse. Neither is a flow calibration issue. Leave the multiplier alone.
Right After Travel Moves
Watch the start of each perimeter. A small missing section at the beginning of a wall, repeated at seams and around islands, points at retraction. Pressure inside the nozzle drops during the pull-back and takes a moment to rebuild. It restarts late.
The rest of each line looks normal. That is the tell.
Starts Partway Through a Long Print
A job that begins well and degrades after an hour has a developing problem rather than a static one. Heat creep, a slowly forming clog, a spool loop trapped under another loop, or a warming extruder motor all behave this way. Check the spool.
Two things worth checking at the moment it starts: whether the extruder begins clicking, and whether plastic dust has collected around the drive gear. Dust means the gear is grinding instead of feeding. Listen for clicking.
Every Layer, From Start to Finish
Consistent thinness through the whole model suggests something that never changes during the job. Candidates: nozzle temperature set low for the material, the wrong filament diameter in the profile, an ongoing partial restriction, weak extruder tension, or a speed the hot end cannot keep up with.
Look for repetition rather than random gaps. If every wall measures under target by roughly the same amount, calibration deserves attention. If the gaps wander, feeding is more likely. Repetition points at maths.
|
Watch out A printer that produced good parts yesterday and gaps today almost never needs a flow change. Something physical moved, wore, or clogged. Raising flow at that point pushes harder against a restriction and can turn a partial clog into a full jam. |
What Actually Causes the Shortage

Under-extrusion can begin anywhere between the spool and the nozzle tip. Anywhere at all. Some causes restrict how easily filament moves. Others stop the hot end melting plastic fast enough to keep up.
Partial Clogs and a Narrower Exit
Burnt plastic, dust, or residue from an earlier spool can shrink the space molten material has to leave through. Unlike a full blockage, a partial clog still lets some plastic pass, which is exactly why it gets blamed on the slicer. If nothing in the profile changed before the gaps started, inspect the nozzle early. Start there.
Temperature, Speed, and the Melt Ceiling
Every hot end has a limit on how much plastic it can melt per second. Push past that and extrusion falls behind the toolpath. Researchers at NIST modelled this boundary directly, deriving an upper bound on feed rates that avoids jamming in filament-based printing. In practice you meet that ceiling during fast infill long before you meet it on slow outer walls. Infill fails first.
Temperature interacts with the same limit. Cold filament resists. Colder filament resists being pushed, so the extruder works harder and flow turns uneven. Needs vary between brands and even between colours of the same material. Labels are a starting point, not gospel.
Filament Condition and Diameter
The slicer estimates how much material to feed based on the diameter you tell it. Get that wrong and every calculation downstream is wrong too. Work from Indiana University on filament diameter tolerance in fused filament fabrication found that irregular diameter shifts the flow rate during extrusion, which shows up as poor surface quality, extruder jams, and visible gaps between adjacent lines.
Moisture is the other material variable. It does not always clog a nozzle, but it changes what comes out. Popping sounds are a warning.
The 8 Fixes, In Order
Physical checks come first, settings second. That order matters, because compensating for a dirty gear with extra flow hides the cause and shortens the life of the hot end. Print the same small test model after each change so comparisons stay honest. Order matters.
1. Clear a Partial Nozzle Clog

An inconsistent free-air strand can indicate a restriction, but it is not conclusive. With the printer handled by an adult according to the service manual, inspect the nozzle exterior and filament path, verify temperature and feed behavior, and use only the manufacturer-approved clog test and cleaning method.
Follow the maintenance steps your printer maker publishes. No improvising here. Hot-end designs differ enough that generic advice can damage a well-sealed assembly. Read the manual.
|
Adult step, every time This is the one fix a child should never do alone. NIOSH lists heat and moving parts among the hazards of desktop 3D printing in its guide to safe 3D printing for schools, libraries, and makerspaces, and Stanford EH&S names contact with hot surfaces as a standing hazard of material extrusion in its 3D printing safety and health guidance. Cut-resistant gloves and eye protection are sensible here. Let a child watch and hand you tools. |
2. Test Temperature Only Within Manufacturer Limits
Start with the printer and filament manufacturer’s validated temperature range. If the profile permits, test one small temperature change while keeping other variables constant; never exceed the lowest applicable filament, nozzle, hot-end, or printer limit, and do not use added heat to force material through a suspected restriction. Stop the test if you notice unusual odor, discoloration, smoke, or abnormal printer behavior.
3. Slow Down and Respect the Flow Ceiling
Cut print speed by roughly a quarter and reprint the same file. One change only. If the missing lines fill in, you were asking for more molten plastic per second than the hot end could supply. Keep the slower profile, or rebalance line width, layer height, and temperature so the required flow stays inside a stable range.
Fast infill is where this shows up first. Outer walls often keep looking fine, which is why the problem gets misdiagnosed as a slicer bug. Speed is the variable.
4. Clean the Extruder Gear and Reset Tension

An adult should power off, unplug, and let the printer cool before accessing the feeder. Clean the gear only by the manufacturer’s documented method and approved tool, keep debris out of bearings and electronics, and confirm that no brush fibers or fragments remain before reassembly.
Check tension while you are in there. The gear should leave a clear grip pattern without chewing a groove. Too loose and it slips. Too tight and it deforms softer filament until it will not feed at all. Aim for the middle.
5. Inspect the Tube and the Whole Filament Path
Spin the spool by hand. Free rotation, no snags. It should turn freely, with no sharp bend where the filament enters the extruder. Any resistance before the hot end lowers the real feed rate no matter what the slicer commands. Feel it by hand.
On printers with a long guide tube, look for wear, deformation, debris, or a fitting that has crept loose. A tube that shifts back and forth during retraction creates a small gap near the hot end where softened plastic collects. Reseat it properly.
6. Dry the Filament and Untangle the Spool
Untangle crossed loops first. Moisture can cause popping, bubbles, rough surfaces, and internal porosity, with sensitivity varying greatly by polymer and formulation. Those symptoms can resemble under-extrusion but do not prove a feed shortfall; verify the material, storage history, and manufacturer drying instructions before drying.
Dry at a temperature suited to that specific material. One setting does not cover PLA, ABS, and nylon. Then reprint the same test and compare directly. Same file, same settings.
7. Confirm Diameter, Then Trim Flow
Check the diameter value in the profile before you touch the flow multiplier. Most desktop printers run 1.75 mm filament, but a profile copied from another machine can carry the wrong number, the wrong nozzle size, or both. Measure with calipers at several points along a length rather than trusting one reading. Do not guess.
Only then adjust flow, and only in small increments of two or three percent. Measure a wall on the test print instead of judging by eye. Needing a large correction is a signal that something else is still wrong. Stop and look again.
8. Retune Retraction and Extra Prime
If the gaps cluster after travel moves, reduce retraction distance gradually and retest. Some slicers add a small extra prime when extrusion restarts, which helps when the printer consistently leaves a short blank at the start of a path.
Use it sparingly. Extra prime on top of badly tuned retraction trades gaps for blobs at every seam. Fix retraction first.
|
Tip Change one variable, print, compare, write it down. Five simultaneous changes may produce a better part, but you will never know which one earned it. |
Why the First Layer Gets Its Own Troubleshooting
Layer one is the only layer where the build surface itself can restrict flow. That makes it special. That makes it a separate problem with separate answers. A printer can extrude perfectly at 20 mm of height and still struggle at 0.2 mm. Height changes everything.
Poor adhesion looks similar and is not the same thing. Watch the filament at the moment it leaves the nozzle. That is where they split.
|
Observation |
Under-extrusion |
Poor adhesion |
|
Shape of the line leaving the nozzle |
Already thin, scraped, or missing in places |
Normal width and evenly formed |
|
What the line does next |
Stays put but never fills the gap |
Curls behind the nozzle or drags across the plate |
|
Where plastic ends up |
Not enough of it anywhere |
Collecting around the hot end |
|
Fix direction |
Raise the nozzle slightly, warm the first layer, slow it down |
Change build surface, clean it, or add adhesive |
Raising global flow to thicken layer one is the wrong lever. It pushes extra plastic through a partly blocked exit and leaves the rest of the model over-fed. Fix layer one instead.
When to Change Flow, and When to Leave It Alone
Flow calibration is a fine adjustment. Nothing more. It is not a repair for a mechanical fault, and reaching for it early is the most common way people hide a clog from themselves.
When adjusting flow is the right call
- Extrusion sounds and looks smooth, with no clicking or grinding.
- Every part comes out slightly thin by roughly the same margin.
- Wall thickness measures under target on a calibration print, repeatedly.
- The nozzle, gear, tube, and spool have all been checked and are clean.
- The problem followed one specific material profile and disappears on a known-good one.
When to leave flow exactly where it is
- The printer worked yesterday with the same file, filament, and profile.
- You can hear clicking, grinding, or the extruder skipping.
- The filament shows a flattened or chewed section near the drive gear.
- Only the first layer is affected, or only the starts of perimeters.
- A correction larger than about five percent would be needed to look normal.
|
Editorial note Extruder step calibration and flow are different jobs. Steps decide whether the machine moves the length of filament it was told to move. Flow trims the final amount of plastic in the part. Fixing the second to cover an error in the first leaves the error in place. |
Prevention: Habits That Keep Flow Steady
Preventing under-extrusion is far cheaper than diagnosing it six hours into a print. Most of it is housekeeping. Nothing exotic.
- Store filament dry and clip the loose end before the spool comes off the holder.
- Rotate the spool by hand and check the first several loops before a long job.
- Brush the drive gear whenever plastic dust appears near it.
- Save a working temperature and speed profile per spool rather than rebuilding it each time.
- Reslice after any nozzle or filament change. An old G-code file is no longer accurate.
- Run a short calibration print before committing to a multi-hour model.
A simple touchscreen can reduce navigation steps, but it does not replace adult supervision. An adult should approve the model and settings, inspect the printer and surrounding area, supervise startup and operation as required by the manual, and perform all maintenance involving hot or moving components.
A failed print then becomes a short lesson instead of the end of the hobby. That is the part most parents care about.
|
AOSEED: BUILT SO FEWER PRINTS FAIL IN THE FIRST PLACE AUTO-LEVELLING, DIRECT-DRIVE FEEDING, AND ONE-PRESS PRINTING REMOVE THREE OF THE MOST COMMON ROUTES TO UNDER-EXTRUSION BEFORE A CHILD EVER TOUCHES A SETTING. COMPARE KIDS' 3D PRINTERS BY AGE AND SETUP EFFORT TO SEE WHICH MODEL FITS YOUR HOUSE. |
Conclusion
Under-extrusion gets easy once you stop guessing at settings and start reading the pattern. Gaps, thin walls, weak layers, and missing sections all trace back to a handful of causes: a partial clog, a restricted filament path, a nozzle sitting too close on layer one, a temperature set too low, a speed past the melt ceiling, or a flow number that never matched the material.
Work physical first. Nozzle, path, spool, gear. Then temperature, speed, retraction, and flow, in that order. That sequence is the whole trick. It keeps you from using extra plastic to paper over a mechanical restriction. When the gaps only follow travel moves, or only appear on layer one, stay in that section instead of rewriting the whole profile.
Once a setup prints cleanly, save the profile and leave it alone. A two-minute calibration print before a long job catches trouble while it still costs almost nothing. Two minutes, maybe three.
Check AOSEED’s current official X-MAKER and X-MAKER JOY pages for price, bundle contents, age positioning, leveling and feeder features, app/library access, warranty, and return terms. Adult supervision remains necessary, and no product feature eliminates the need to stop printing when under-extrusion or abnormal machine behavior appears.
FAQs
How can I fix under-extrusion in 3D printing?
Check the nozzle, filament path, and extruder before you increase flow. A partial clog is the most common cause of a sudden onset, and it is deceptive because some plastic still comes out while gaps and thin layers appear. Heat the nozzle and extrude by hand: the strand should be smooth, even, and straight. Sideways curl means debris. Then inspect the drive gear for plastic dust, confirm the spool turns freely, and look for resistance anywhere along the tube. If all of that is clean, try five degrees more heat or a quarter less speed, since a hot end can under-extrude when the requested flow exceeds what it can melt each second. Adjust the extrusion multiplier last. Practical tip: change one variable, reprint the same small test, and note the result before moving on.
What is under-extrusion in 3D printing?
Under-extrusion is a shortfall between the plastic the slicer calculated and the plastic that actually left the nozzle. The slicer works out a target from line width, layer height, speed, and filament diameter. When real output falls under that target, lines become too narrow to touch their neighbours, layers bond poorly, and the printer leaves empty space where solid material belonged. Two routes only. The shortage comes from either restricted flow or poor feeding. A clog narrows the exit path, while a slipping gear means the filament never reaches the hot end in the first place. The part often finishes and looks nearly right, which is why the defect gets missed until something breaks. Practical tip: hold a finished wall against a bright light and look for gaps you did not expect.
Why is my 3D print experiencing under-extrusion after retraction?
Extrusion is failing to restart cleanly once the nozzle finishes travelling. Retraction pulls filament backward before a travel move to reduce oozing, then pushes it forward again when printing resumes. If too much pressure is removed, or the filament takes too long to return, the next line begins with a short gap. The pattern is recognisable: missing material right at seams, at the start of perimeters, and wherever the nozzle jumps between separate islands, while the rest of each line looks normal. Everything else prints fine. Retraction also controls stringing, so pushing the setting too far in either direction just swaps one defect for another. Practical tip: use a dedicated retraction test model rather than a large part, so each small change is quick to judge.
Why is my first layer under-extruding?
The nozzle is probably too close to the print bed. When the gap shrinks below what the layer height needs, the build surface partly seals the nozzle opening and molten plastic has nowhere to go. First-layer lines then look extremely thin, scraped flat, transparent, or absent in patches, usually worse in one region of the plate if levelling is uneven. If extrusion turns normal as soon as the printer climbs above layer one, a general flow problem is unlikely. Look at the gap. A cold first layer or a fast first layer makes the same symptom worse, because the filament is already hard to push. Practical tip: raise the Z-offset in small steps until neighbouring first-layer lines touch without being crushed flat.
Does under-extrusion cause stringing?
Not directly, though the two often show up together because they share settings. Stringing happens when unwanted plastic escapes during travel moves. Under-extrusion means too little plastic reached a path that should have been printed. Retraction links them: too little effective retraction leaves fine strings between separate areas, while an unsuitable retraction setup creates weak restarts. Same dial, opposite failures. Temperature links them too. Lowering heat to fight stringing while printing quickly can starve the hot end, because it no longer melts material fast enough to meet demand. That is how aggressive tuning trades one defect for another. Practical tip: settle on a stable printing temperature first, then make small retraction adjustments and retest each one.
Can bad filament cause under-extrusion?
Yes, in three distinct ways. A tangled spool physically resists the extruder, so the gear slips instead of feeding steadily. Inconsistent diameter changes how much material enters the hot end per millimetre of feed, which throws off every flow calculation downstream. Absorbed moisture alters behaviour inside the nozzle and in the finished part, and moisture sensitivity varies enormously between materials, so a single drying temperature is not safe for every spool. Poor surface quality on the filament itself makes extrusion less predictable as well. Look before you slice. Before you touch a slicer setting, unwind a metre and look at it. Practical tip: keep the loose end clipped whenever a spool comes off the holder, since that is when most tangles form.
What does under-extruding look like?
Missing plastic where solid material was expected. The usual signs are gaps between perimeter lines, walls thinner than the model specifies, incomplete layers, sparse or airy-looking infill, small holes across top surfaces, and sections that feel brittle. The pattern points at the cause. Location is information. Gaps everywhere suggest restricted flow, calibration, temperature, or speed. Missing material only after travel moves points at retraction. Trouble limited to layer one usually means the nozzle sat too close to the bed. Under-extruded parts also feel weaker than their dimensions suggest, because neighbouring lines have less material joining them. Practical tip: photograph the failure before you change anything, so you can compare the next test print honestly instead of from memory.
Can a 0.4 mm nozzle print a 0.1 mm layer height?
Yes, on any printer whose firmware and profile support it. Layer height sets the vertical thickness of each pass. Nozzle diameter mainly governs the size of the opening and the practical width of an extrusion line. A common working guideline keeps layer height below roughly 80% of nozzle diameter, which puts the ceiling for a 0.4 mm nozzle somewhere near 0.3 mm. A 0.1 mm layer sits comfortably under that, and many stock profiles for a 0.4 mm nozzle already run at 0.15 mm. The cost is time, since the same model needs twice as many layers as a 0.2 mm print. Plan for it. Practical tip: start from your printer maker tested 0.1 mm profile rather than editing the layer-height field inside an unrelated one.
Sources
- National Institute of Standards and Technology, “Upper bound of feed rates in thermoplastic material extrusion based additive manufacturing”
- Indiana University Journal of Undergraduate Research, “Effects of Filament Diameter Tolerances in Fused Filament Fabrication”
- National Institutes of Health, PubMed Central, “Effects of Environmental Temperature and Humidity on the Geometry and Strength of Polycarbonate Specimens Prepared by Fused Filament Fabrication”
- National Institutes of Health, PubMed Central, “The Influence of Moisture Absorption and Desorption by the ABS Filament on the Properties of Additively Manufactured Parts Using the Fused Deposition Modeling Method”
- Centers for Disease Control and Prevention, National Institute for Occupational Safety and Health, “Approaches to Safe 3D Printing: A guide for makerspace users, schools, libraries, and small businesses”
- Stanford University Environmental Health & Safety, “3D Printing Safety and Health Guidance”








Further reading

Thanksgiving STEM Activities for Kids: Table Projects and Simple Engineering Challenges

Halloween STEM Activities for Kids: Spooky Builds That Teach Real Science

STEM Crafts for Kids: Build, Decorate and Test



