

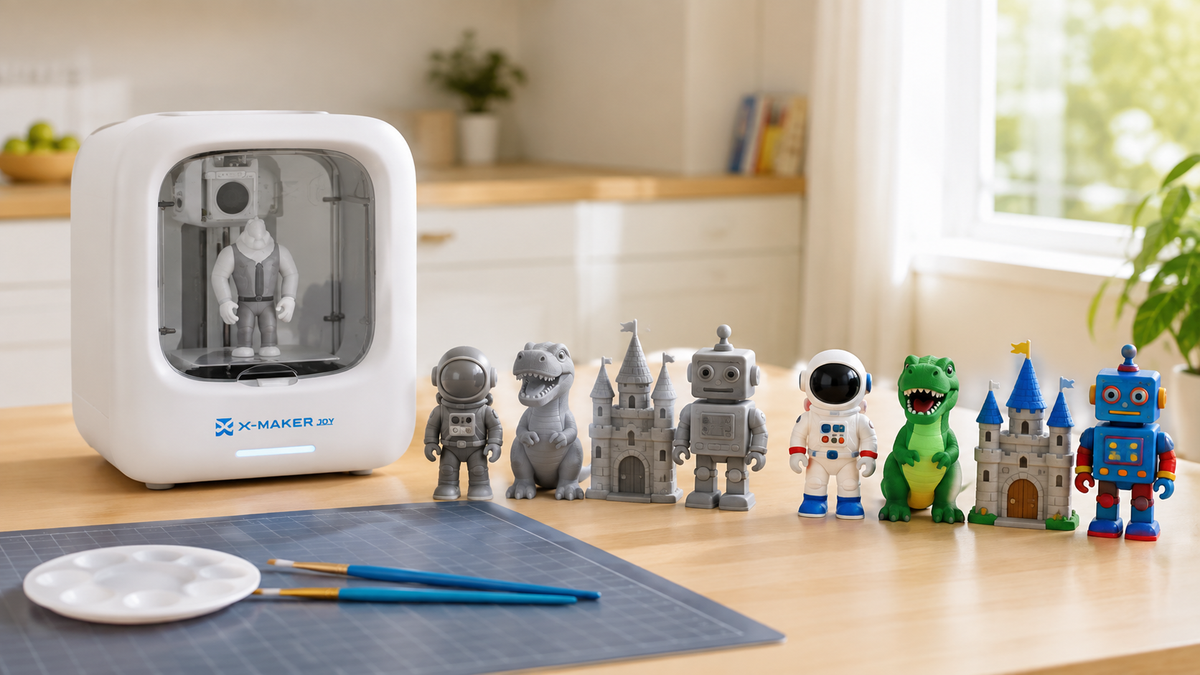
How to Paint PLA 3D Prints With Kids: 9 Safe Setup Steps
A finished PLA print is a blank canvas. Paint is what turns a grey dragon into a dragon your kid actually wants on their shelf, or a plain nameplate into a bedroom door sign. Most painting guides you will find were written for adult hobbyists with a spray booth in the garage and a shelf of solvents next to it.
Kids need a different plan.
Brushes and age-labeled craft paint fit a child perfectly well. Hobby knives, power sanders, aerosol primer, and spray clear coat do not. Not even once. The trick is splitting the job so the messy adult work happens first and the child arrives at a clean, ready model with nothing but color left to add.
These nine steps do that split. They also cover sanding, primer, paint choices, sealing, and the handful of small mistakes that ruin an otherwise good finish. None of it is complicated.
Who Does What: The Quick-Pick Table

Start here. If you only read one part of this guide, read this table. Everything else is detail.
|
Task |
Who Handles It |
Why |
|
Choosing colors and the model |
Child |
No tools, no coatings, full creative ownership. |
|
Brush painting base coats |
Child, supervised |
Water-based craft paint labeled for their age group. |
|
Fine details and masking tape |
Child, roughly age 7 and up |
Needs a steady hand, not a sharp tool. |
|
Support, raft, and brim removal |
Adult only |
Flush cutters and knives slip near thin features. |
|
Sanding layer lines |
Adult, or older child with eye protection |
Dust and friction heat build up quickly. |
|
Aerosol primer and spray paint |
Adult only, away from the kids' table |
Spraying creates airborne mist and can release VOCs. |
|
Spray clear coat |
Adult only |
Same handling rules as spray paint. |
|
Final cure and handoff |
Adult |
Paint feels dry long before it is actually hard. |
Is It Safe for Kids to Paint PLA 3D Prints?

Yes. The materials have to be chosen for the child, and the higher-risk steps have to stay with an adult. The plastic is not the concern. Tools and coatings are.
Read the package before you hand anything over. Under U.S. rules, art materials sold here must be reviewed for chronic hazards and carry a conformance statement, and any material that poses a hazard has to be labeled accordingly. The CPSC guidance on art materials spells out what that statement looks like. On a store shelf it is the fastest filter you have.
Which Painting Tasks Kids Can Handle
A child may brush-paint a fully prepared model when an adult confirms that the activity matches the child’s age, abilities, and supervision needs and that every paint, brush, and accessory is labeled and used as directed. The adult should remain present throughout the activity
Keep the station small. A finished print, three or four brushes, a little paint on a palette, a cup of water, and paper towels covers a first project. That is genuinely enough.
An adult should complete sanding before the child joins the activity. If a school or manufacturer-approved procedure allows an older child to hand-sand, use the exact material controls, eye protection, effective dust capture or ventilation, close supervision, and thorough hand and surface cleanup.
Which Steps Should Stay Adult-Only
Sharp cutters, powered sanders, aerosol cans, and any product whose label warns against use by children belong to the adult. Supports snap without warning. A blade working close to a thin antenna or a wing has nowhere good to go when it slips.
Spraying deserves its own rule. Aerosol application turns liquid coating into a mist that drifts past the model, and EPA lists paints and hobby products among common indoor sources of volatile organic compounds. In workplaces, OSHA addresses the same hazard through the ventilation requirements for spray-finishing operations under 29 CFR 1910.94. A kitchen table is not a spray booth. It never will be.
|
Adult-only, no exceptions Spray primer, spray paint, and spray clear coat. Apply these where the label permits, with children out of the area, and bring the model back only after the stated drying time. |
Why the Label Beats the Smell Test
Do not judge a paint by its color, its smell, or the word "craft" on the front of the can. Read the back. Check the age guidance, the hazard wording, the ventilation instructions, the cleanup directions, and the drying times.
This matters most with sprays and solvent-based products. Schools work from the same logic: the NIOSH spray-finishing safety checklist for schools treats ventilation as a control measure rather than a suggestion, and the CPSC art and craft safety guide advises against putting cautionary-labeled materials in front of elementary-age children at all.
What You Need Before the First Brush Goes Down
You do not need a finishing workshop. A basic project needs brushes, paint, a covered table, water, and a prepared print. Display pieces need more: sandpaper, filler primer, masking materials, and a clear coat.
Sort the supplies into two piles and keep them apart. Kids should never have to work out for themselves which can is off limits. That is the adult's job.
|
Supply |
Kids' Table or Adult Bench |
What It Actually Does |
|
Water-based acrylic craft paint |
Kids' table |
Brushes on easily, cleans with water while wet, comes in every color. |
|
Brush set: wide flat, medium round, fine tip |
Kids' table |
Covers large panels, then handles eyes, lettering, and patterns. |
|
Masking tape |
Kids' table |
Splits a model into clean color zones with sharp edges. |
|
Sandpaper and sanding sticks |
Adult bench |
Flattens support scars, seams, and pronounced layer ridges. |
|
Filler primer |
Adult bench |
Builds a sandable layer that levels shallow scratches and print texture. |
|
Spray paint or spray sealer |
Adult bench |
Covers large surfaces evenly. Creates airborne mist during use. |
|
Eye protection and gloves |
Adult bench, shared as needed |
Small fragments fly during clipping and sanding. Labels may also require gloves. |
Kid-Friendly Acrylic Paints and Brushes
Water-based acrylic craft paint is the practical default for PLA. It builds color in thin layers, it forgives mistakes, and it rinses off brushes while still wet. Check the age label. Then follow the maker's directions.
Do not overload the palette. Small amounts are easier for small hands to control, and they waste far less paint.
Sanding and Cleaning Supplies
Sandpaper flattens support marks, rough edges, and visible ridges before any color goes on. A range of grits beats one aggressive sheet. Sanding sticks and nail-file-style tools reach into narrow places that a folded sheet cannot.
Post-processing depends mainly on model orientation, support placement and interface settings, layer height, flow calibration, nozzle condition, material, and the geometry of the part. Preview the supported surfaces before printing and test a small section when finish quality matters.
Keep a soft brush and a lint-free cloth nearby. Dust left on the surface gets locked under the first coat, and it shows.
Primer, Masking, and Clear Coat
Primer evens out the surface and gives paint something consistent to grip. Filler primer goes further, filling small scratches and shallow layer lines. Neither is mandatory.
A quick toy that still shows its printed texture can be painted without primer at all. A display model earns the extra cycle. Many filler primers are aerosols, though, which puts them squarely on the adult bench.
|
WHY THIS MATTERS FOR AOSEED FAMILIES: PAINTING IS THE SECOND HALF OF A PRINT. THE FIRST HALF IS GETTING A CLEAN MODEL OFF THE PLATE WITHOUT A WEEKEND OF CALIBRATION. AOSEED BUILDS 3D PRINTERS FOR KIDS THAT RUN PLA IN A FULLY ENCLOSED BAY WITH ONE-TAP APP CONTROL AND AUTO LEVELING, SO THE PART YOUR CHILD PAINTS ARRIVES SMOOTH ENOUGH TO SKIP MOST OF THE HEAVY SANDING. |
The 9 Safe Setup Steps
Order matters as much as technique. Messy adult work comes first. Color goes onto a prepared surface, never onto loose debris.
Step 1: Choose a Well-Ventilated Painting Area
Set the brush station somewhere with good airflow and enough room for the model, the paint, and the pieces drying beside it. Food and drinks go elsewhere. If any spray product is involved, follow that product's location and ventilation directions, and keep children out of the area while it is applied.
Step 2: Cover the Table and Sort the Supplies
Protect the surface first. A washable mat, flattened cardboard, or a few sheets of heavy paper catches drips and shortens cleanup enormously. Put only the child's supplies within reach. Everything else stays out of the room.
Decant each color onto a small palette instead of handing over the bottle. Fewer spills. No muddy mixes going back into the original container either.
Step 3: Remove Supports Before Kids Start Painting

Take off supports, rafts, and brims before any surface work begins. Large structures often snap away by hand. Small contact points need cutters.
Work slowly around fingers, horns, antennas, wings, and other thin details. Cutting too close gouges the surface, or takes the feature with it. Once the supports are gone, run a finger over the model and find the sharp nubs that still need attention. You will feel them before you see them.
Step 4: Sand the Rough Spots, Not Everything
Target the defects. Support scars, seams, blobs, and strong layer lines deserve the attention. The rest probably does not.
Start with a grit coarse enough to remove the flaw without cutting into the shape, then move finer as the scratches shrink. Light pressure matters. Aggressive sanding rounds off crisp edges and generates enough friction heat to soften PLA. If the child is only brush painting, finish this step before they sit down.
Step 5: Clean Off Dust, Dirt, and Finger Oils
Paint grips a clean surface. Brush away the sanding debris, then wipe the model using the method suited to the paint and primer you plan to use. Mild soap and water works for many basic projects, provided the print dries fully afterward. Fully means fully.
Never prime over visible dust. Primer locks the particles in, and the finish turns gritty.
Step 6: Prime the PLA When the Finish Calls for It
Prime when you want smoother color, stronger coverage, or help hiding minor marks. Filler primer earns its place on prints where sanding alone left texture behind. Otherwise skip it.
Apply light coats. Heavy primer pools in corners and softens fine detail, which is the opposite of the point. Let it dry per its label. Only then sand again or add color.
|
Tip Inspect the primed model under bright, raking light. Low spots and leftover scratches show up as shadows that are invisible on bare grey PLA. |
Step 7: Apply Paint in Thin, Even Layers

Thin coats preserve printed detail. The first pass may look streaky and let primer show through, and that is normal. Let it dry. Then add another.
Two or three light applications give far more control than one loaded brush. For a child it is easier, too. Less paint on the bristles means fewer drips running into eyes, letters, and grooves.
Step 8: Add Details, Masking, and a Clear Coat
Once the base colors are dry, switch to fine brushes for the small work. Masking tape makes stripes, panels, and two-tone sections land cleanly. Press it down firmly so paint cannot creep underneath. Peel it back slowly, never straight up.
Sealing is optional. If you do seal, check that the clear coat suits the paint underneath. Aerosol sealers stay an adult job.
Step 9: Let the Print Cure, Then Clean Up
Park the finished model somewhere it will not get bumped or picked up early. Paint reaches dry-to-touch long before it reaches full handling strength. Those are not the same thing.
Wash reusable brushes per the paint maker's directions, close every container, wipe the table, and return the adult-only products to secure storage. Hand the model back only after the coatings have dried or cured for the time stated on their labels.
What Paint Works Best on PLA?

PLA accepts several kinds of paint once the surface is prepared. For a project with children, the application method and the label matter as much as chemistry. Sticking to plastic is not the test. A paint can adhere beautifully and still be wrong for a kids' craft table.
|
Paint Type |
Best For |
Who Applies It |
|
Water-based acrylic craft paint |
Base coats, characters, animals, toys, school projects |
Child, using an age-labeled product |
|
Model acrylics |
Tiny panels, faces, buttons, markings |
Child or adult, after checking the label |
|
Spray paint |
One even base color across helmets, props, large parts |
Adult only, per the product label |
|
Airbrush paint |
Gradients, shadows, smooth transitions |
Adult operated in most family setups |
|
Enamel and lacquer |
Hobby finishes on display models |
Adult only. Formulas and warnings vary widely |
Acrylics stay the easiest starting point. They layer well, switch colors without fuss, and support simple effects like dry brushing across raised texture. Kids pick it up fast. Very fast.
How Much Prep Does PLA Really Need?
Surface prep decides how much of the printed texture survives under the color. A rough print stays rough unless you correct it first. Not every model needs to be glass smooth, though. Match the prep to the goal.
When PLA Needs Sanding
Sand when support marks, seams, blobs, or layer lines would distract from the finished paint. Display pieces earn the effort. A toy headed straight for a play bin usually does not.
Spend the time on the surfaces people will actually look at. Ignore the underside.
Which Grit to Start With
Begin coarse enough to remove the defect without biting into the model, then step finer as the scratches get smaller. The exact sequence shifts with print quality, model shape, and the finish you want. Do not chase a grit number. Detail is worth more.
Deep Layer Lines and Gaps
Some seams take too long to remove by sanding alone. A hobby filler or filler primer cuts the work down. Fill it. Let it harden per its instructions, sand level, and repeat only where needed. Fillers carrying warnings or ventilation requirements belong to the adult.
When You Can Keep Layer Lines Visible
Layer lines are not always a defect. On toys, school projects, and decorative prints they read as part of the 3D printed look. Skipping heavy sanding protects fine features too, and it shortens the project. That suits younger kids who care more about color choices than about a display finish.
Surface treatment does change the result, and that is measurable. Research published in Polymers on coating 3D-printed surfaces compared sanded and unsanded printed polymers under several coating systems and found the preparation method affects the final surface properties. Prep is not cosmetic superstition. It just is not always necessary.
Sealing and Protecting the Finished Print
A clear coat protects paint on anything that gets handled often, and it lets you control the shine. Choose it based on the paint underneath and how the model will be used. Test unfamiliar combinations on a scrap print first. Hours of work deserve that.
- Matte reduces reflections. Good for figures, rocks, clothing, and weathered props.
- Satin keeps a slight sheen without looking polished.
- Gloss gives the strongest shine. Good for gems, wet effects, armor, and signs.
- Brush-on sealer offers more control over placement and avoids aerosol handling entirely.
- Spray sealer covers complex shapes more evenly but carries the same rules as spray paint.
There is no single cure time that fits every product. Check the label for dry-to-touch, recoat, handling, and full-cure figures, because those describe different stages. Patience is cheap. Repairing a thumbprint is not.
Mistakes That Spoil a Kid's Paint Job
Most disappointing finishes trace back to prep rather than to the paint itself. The paint usually gets blamed anyway.
- Painting over dust or finger oils. Clean after sanding and hold the model by a base or hidden area.
- One thick coat instead of two thin ones. Heavy paint runs into grooves and dries unevenly.
- Skipping drying time. Wet layers smear when a new brush passes over them, and tape lifts soft paint.
- Sanding too hard. Pressure flattens raised detail and power tools heat one spot fast.
- Spraying indoors as though a room were a booth. Follow the label and keep kids out during application.
- Pulling masking tape straight up off a fresh coat. Peel it back slowly, and touch up any lifted edge after it dries.
Give kids who want to keep going a second prepared print. Alternating between two models beats rushing one. Rushing shows.
When to Keep It Simple, and When to Go Display Quality
Both routes are legitimate. Pick the one that matches what your child actually wants out of the afternoon. Ask them.
Keep it simple when:
- The child is young and mostly excited about choosing colors.
- The print is a toy, a game piece, or a giveaway that will get handled hard.
- Visible layer lines read as texture rather than as a flaw.
- You want the project finished in one sitting.
- Nobody in the house wants to run an aerosol today.
Go display quality when:
- The model is a gift, a science-fair entry, or something going on a shelf.
- The filament color underneath is hard to cover with bright paint.
- The child is old enough to enjoy the sand, prime, inspect, repeat loop.
- You can spread the work across two or three short sessions.
- An adult is available for the spray and sealing stages.
Conclusion
Painting PLA with kids works when the project is split honestly. Children choose colors, brush on age-appropriate paint, add details, and try simple effects. Adults take the rest. Cutters, heavy sanding, aerosol primer, spray paint, spray clear coat.
Prep does the rest of the work. Pull the supports, sand only what needs it, clear the dust, then decide whether the finish justifies primer. Thin coats protect small printed detail better than one heavy layer ever will.
Read every label before it reaches a child's hands. Every time.
That first clean print is what makes the whole thing pleasant, which is where the printer choice shows up. AOSEED builds around a guided app, a library of 8,000+ reviewed toy models, and enclosed PLA printing, so the model your child paints on Saturday is not the result of a Friday night spent calibrating. The X-MAKER JOY, built for ages 4 and up, currently sells for $229.00, down from $339.00, and ships with a 30-day return window and a one-year warranty. Print it, paint it, then go find the next thing to make.
FAQs
What paint to use on PLA 3D prints?
Acrylic paint is the practical choice for most PLA prints, especially with kids involved. It brushes on easily, comes in every color, and builds up through several thin layers instead of one heavy one. For a children's activity, choose a water-based art paint labeled for their age group rather than assuming every acrylic formula is interchangeable. Model acrylics handle fine details well. Adults may reach for spray paint or an airbrush on large base coats. Enamels and lacquers work in some hobby workflows, but the formulas and warnings vary enough that they make a poor default for a kids' craft table. Clean the PLA first, then use two or three light coats. Two or three light coats. That single habit does more for the finish than any brand choice.
Can you paint straight onto a PLA 3D print?
Yes, if the print is clean and you are content with its existing texture. This works well for quick crafts, colorful toys, classroom models, nameplates, and anything where layer lines read as part of the printed look. The tradeoff is surface quality. Support scars, ridges, and small defects stay visible after painting, and some colors need extra coats to cover the filament underneath. Sanding and primer become worthwhile once you want a display finish or need to hide imperfections. For a kids' project, have an adult remove supports and knock down the rough areas first, then let the child paint the prepared model in thin coats. Test on the underside first. Then commit to a visible face.
Can I spray paint PLA without primer?
Yes, though the result will show more layer lines, scratches, and color variation. Primer gives spray paint a consistent base and helps most when the raw print carries obvious sanding marks or the filament color is hard to cover. Filler primer goes further, reducing shallow print texture before any color lands. Skipping it makes sense on fast projects where the 3D printed appearance is fine. Preparation still matters either way: loose plastic, sanding dust, and fingerprints all show through. Because spray products create airborne mist and may release VOCs, an adult should handle spraying according to the product label and well away from where children are working. Clean it. Sand it lightly. The finish improves without primer.
Do I need to prime PLA before painting?
No. Primer is not required every time. A clean print can be painted directly when the project is casual and some original texture showing through is acceptable. Primer earns its place when you want smoother coverage, need to spot sanding marks, or want one consistent base color under bright paint. Filler primer adds help with shallow layer lines that survived sanding. For a child-focused project, an adult can complete any priming first and hand over a fully dried model to decorate. Do not pick a primer just because another maker used it. Confirm it suits your planned coating system and follow its label. Speed over perfection? Skip primer, and test the paint on a small area first.
What is the best primer for PLA?
A sandable primer made to work with plastics is a solid general choice. If visible layer lines and small scratches are the real problem, filler primer usually serves better, because it builds a thicker coating that can be sanded smooth once dry. The right pick depends on the condition of the model. A print that is already smooth may only need a normal primer to create an even base for color. A rougher print benefits from a cycle of sanding, filler primer, inspection under good light, and gentle sanding again. No primer will hide deep gaps, broken features, or large support scars on its own. Many filler primers are aerosols. For projects with children, an adult handles that step per the label.
Can you use regular spray paint on PLA?
Many spray paints intended for compatible plastic surfaces work on prepared PLA, but check the specific product rather than assuming every can behaves the same. Paint chemistry, primer requirements, recoat intervals, temperature limits, and ventilation directions differ between brands and product lines. Prepare the model by removing supports, sanding the obvious defects, and clearing away dust, since spray paint tends to highlight bumps rather than hide them. Prime when a smoother base is needed. Apply light, controlled passes instead of chasing full coverage in one go. Spray painting should be the adult-handled part of a kids' project, because aerosol application creates airborne mist and some products release VOCs. Always test unfamiliar paint on scrap PLA first.
Does PLA need to be sanded before painting?
Not always. Sanding exists to remove support marks, rough patches, seams, blobs, and layer lines you do not want locked under the paint. If the print already looks good and the goal is a simple craft, an adult can smooth only the sharp or damaged spots and leave the rest alone. A display piece usually needs several sanding stages followed by primer, because every layer of coating follows the shape of the surface beneath it. More sanding is not automatically better: excess pressure erases small printed details and rounds off edges that were meant to be crisp. For a project with kids, do the major sanding before the painting session. Their time should go into color and design.
How do you prep PLA for spray paint?
Start by removing supports, rafts, brims, and any loose plastic that would show through the finish. Sand the visible support scars and unwanted layer lines, then clear the sanding dust so the coating lands on a clean surface rather than on loose particles. Next, decide whether primer is needed. A fairly smooth model can sometimes go straight to a compatible spray paint, while filler primer helps when shallow texture remains, and it can be sanded after drying for a flatter base. Let every preparation coat dry per its manufacturer before the next product. Mount or suspend the model so an adult can reach several sides without touching wet paint. Light passes win. One heavy coat does not.
Sources
- U.S. Consumer Product Safety Commission, “Art Materials”
- U.S. Consumer Product Safety Commission, “Art and Craft Safety Guide”
- U.S. Environmental Protection Agency, “Volatile Organic Compounds’ Impact on Indoor Air Quality”
- Occupational Safety and Health Administration, “1910.94 - Ventilation”
- National Institute for Occupational Safety and Health, “Spray Finishing: Safety Checklist Program for Schools”
- Polymers, “Surface Finishing of 3D-Printed Polymers with Selected Coatings”



Further reading

Thanksgiving STEM Activities for Kids: Table Projects and Simple Engineering Challenges

Halloween STEM Activities for Kids: Spooky Builds That Teach Real Science

STEM Crafts for Kids: Build, Decorate and Test



