

How to Glue PLA Parts: 6 Methods for Toys and School Projects
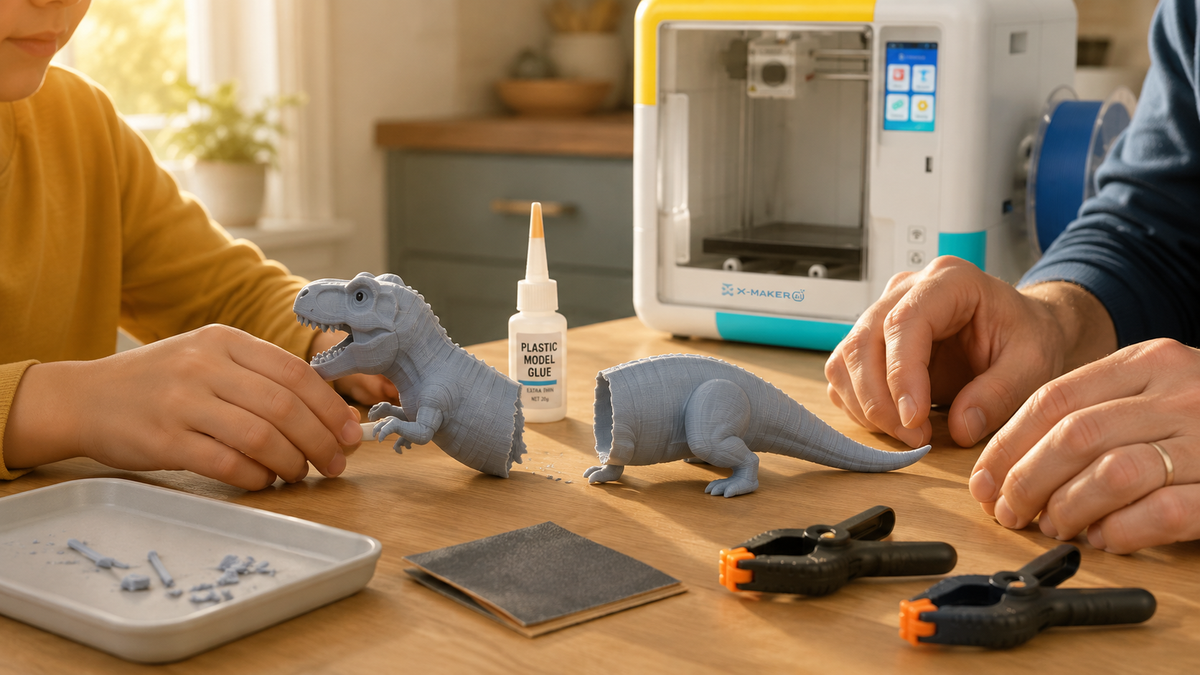
A dinosaur tail snaps off. A science fair tower arrives in four pieces because the build plate was too small. Somebody sat on the rocket. For decorative, non-load-bearing PLA parts, gluing can be faster than reprinting after an adult checks the break, intended load, loose-fragment risk, and adhesive instructions. Reprint or redesign parts that are load-bearing, heat-exposed, food-contact, safety-critical, or likely to create a hazard if the repair fails.
PLA blends and finishes vary in surface texture, additives, coatings, and heat response. Identify the filament and any coating, check the adhesive or tool manufacturer’s compatibility guidance, and test on a scrap piece before using glue or heat. When using a heat tool, stay within the temperature guidance for the material and tool.S
Six methods cover almost every home and classroom repair. Each has a job it is good at. Each also has a job it will fail. Start with the table below. Then read the section that matches your project.
|
Your Project |
Best Method |
Working Time |
Main Risk |
|
Small toy arm, wheel, or figure part |
Thin or gel super glue |
A few seconds |
Grabs before you can straighten it |
|
Bracket, handle, or anything carrying weight |
Two-part epoxy |
Minutes, per the label |
Wrong mix ratio stays soft |
|
Edges that do not meet flush |
Epoxy, or a printed shim first |
Minutes |
Glue alone cannot replace missing plastic |
|
Classroom display due this period |
Hot glue |
Seconds to cool |
Thick visible bead, softens thin walls |
|
Hollow prop, helmet, or large shell |
3D pen weld on the inside |
As long as you need |
Heat distorting the outer surface |
|
Hidden structural seam, looks do not matter |
Heat weld with a soldering iron |
Slow and controlled |
Melting straight through a wall |
|
You have a confirmed PLA-compatible cement |
Solvent bonding |
Minutes |
Chemical damage to the finish |
What Is the Best Way to Glue PLA Parts?
There is no single answer. A hollow display model and a working robot arm need different joints. Same spool, different problem.
Ask two questions first. What force will this joint see? How closely do the two faces already meet? Those answers pick the adhesive for you.
Match the Method to the Load
Super glue cures hard and thin. That suits rigid PLA and small contact patches. It wins on miniatures and snapped tabs.
Epoxy behaves differently. It forms a thicker layer and spreads stress across a wider area. It also stays workable long enough to nudge a large section into place. Choose it when failure would be annoying, not cosmetic.
Hot glue sits in its own category. Fast, cheap, visible, weak. Perfect for a poster board volcano. Wrong for a hinge.
Check the Fit Before You Check the Glue
Most failed repairs are fit problems wearing an adhesive costume. Two narrow edges pressed end to end give the glue almost nothing to hold. No brand fixes that.
Press the pieces together dry. Look for rocking, daylight through the seam, and leftover support nubs. Fix those first. Then think about glue.
Measure the widest gap and compare it with the adhesive manufacturer’s stated gap capability. If the mating faces do not make broad contact, add a fitted PLA shim or redesign the joint rather than relying on thin CA to bridge the space. For larger gaps, use a manufacturer-approved gap-filling adhesive or repair method that is compatible with the printed material..
|
TIP Dry-fit, then mark the correct position with a pencil tick on both halves. When the glue is already wet, you will not be guessing at the angle. This one habit prevents most crooked seams. |
How to Prepare PLA Parts Before Gluing

Preparation beats price. Dust, skin oil, and a rough support scar all sit between the plastic and the adhesive.
None of it takes long. Five minutes of prep beats an hour of re-gluing.
Dry-Fit First, Every Time
Hold the pieces together with no adhesive at all. Check the angle from the front, the side, and above. A seam can look straight from one direction and be twisted from another. Both views count.
Trim print artifacts with a hobby knife or a small file. Remove only what stops the faces from touching. Nothing more.
Clean Off Dust, Oils, and Print Residue
Sanding dust is the usual culprit. It mixes with the glue and holds the two faces apart by a fraction of a millimetre. That is plenty.
Brush loose particles away. Mild soap and water works for most prints. Let them dry all the way through. Isopropyl alcohol is fine on bare PLA in small amounts. Test it first if the model is painted, coated, or has decals.
Never glue a damp surface.
Sand Only the Mating Faces
Light sanding helps when the surface is glossy or ridged. Around 220 to 400 grit is enough. You want clean contact, not removed material.
Keep the sandpaper off the show surface. Then clear the dust again. Every time.
Rougher is not automatically better. Some adhesives want two smooth faces making broad, flat contact.
Plan the Clamp Before the Glue
Decide how the joint will be held while it sets. Spring clamps. Rubber bands, painter’s tape, a bag of rice as a weight, or a cardboard jig all work.
Practise the clamping motion dry. Fumbling with a clamp while epoxy cures is how parts end up crooked. Rehearse it once.
Use only enough pressure to keep the surfaces touching. Over-tightening squeezes the adhesive out. It can also crush thin walls.
|
WARNING Moisture triggers cyanoacrylate. The CDC and NIOSH chemical hazard entry for cyanoacrylate lists rapid polymerization on contact with moisture, so a wet or humid surface can set the glue before the parts are even aligned. |
Method 1: Super Glue for Small Toy Parts
Cyanoacrylate, usually sold as super glue or CA glue, is the default for small PLA repairs. It bonds fast. It needs almost no material, and it leaves a narrow seam that is easy to hide.
It cures rigid. That matches PLA. It works against you on anything that flexes or twists repeatedly.
Thin Versus Gel Cyanoacrylate
|
Thin CA |
Gel CA |
|
|
Consistency |
Watery, wicks into seams |
Thick, stays where placed |
|
Best for |
Tight, flush joints |
Slightly uneven faces, vertical seams |
|
Positioning time |
Almost none |
A little more |
|
Gap filling |
None |
Minor irregularities only |
|
Mess risk |
Runs across the surface |
Lower |
|
Typical use |
Antennas, thin arms, hairline cracks |
Awkward toy parts, chipped edges |
How to Apply It Without a Mess

Dry-fit. Decide the hold. Place one small drop on a single mating face.
Spread it only where the pieces will actually touch. On tiny parts, a toothpick beats the bottle tip. By a wide margin.
Bring the halves together in one movement. Hold for the time on the label. Set the model somewhere it cannot be knocked, then leave it alone.
Resist adding glue around the outside of the seam. Extra CA leaves hard ridges and a white haze that takes longer to sand off than the original crack took to fix.
When Super Glue Is the Wrong Pick
Skip it when the gap is wide, when the joint flexes, or when the part gets peeled sideways in normal play. The cured bond is hard and brittle. Force on one narrow edge finds the weak point.
Large assemblies are awkward too. CA starts gripping before you finish aligning a big section. Epoxy buys time.
|
WARNING CA bonds skin faster than plastic. A case report on hands accidentally glued together with cyanoacrylate notes that acetone released the bond without any need for cutting. Never pull glued skin apart by force, and keep the bottle away from small children. |
Method 2: Two-Part Epoxy for Load-Bearing Joints
Epoxy arrives as resin plus hardener. Mix them at the ratio the manufacturer specifies. They react into a hard adhesive layer.
Pick epoxy when the joint has to survive being carried, dropped, leaned on, or handled every day. It forgives imperfect edges.
Mixing and Applying Epoxy

- Read the label before opening either container. Ratios and cure windows vary between products.
- Dispense the stated amounts onto a disposable surface. An empty pill blister works well.
- Blend until the colour and texture look even throughout. Streaks mean an incomplete mix.
- Spread a controlled layer across the mating area. Continuous coverage, not a mound in the middle.
- Bring the parts together, apply gentle pressure, and check the alignment from several angles.
Never guess the ratio. Too much hardener bubbles or runs hot. Too little leaves the joint tacky for days.
Filling Small Gaps
Epoxy bridges spaces thin CA cannot. Chipped edges and large sectioned prints both benefit.
Keep the gap sensible. A wide cavity filled only with adhesive stays weaker than a joint containing solid plastic. Drop in a printed shim or a PLA offcut and let the epoxy bond that insert to both walls.
Clamping and Curing
Set time and full cure are different things. A joint can feel firm hours before it reaches the strength the product was designed for.
Leave the clamps on for the period the manufacturer lists. Remove support early and a heavy section creeps out of alignment while the resin is still moving.
Build the cure window into your schedule. Glue it the night before and you have no room to fix a failed seam.
|
WARNING Uncured epoxy is a skin hazard, not just a mess. OSHA guidance on polymer resin systems notes that uncured epoxy resins present a significant dermal exposure hazard, causing irritation, rashes, and dermatitis on prolonged contact, and that sensitization can develop. Gloves on. Adults mix. |
Method 3: Hot Glue for Fast Classroom Builds
Hot glue is cheap, everywhere, quick. For a display model, a sign, a mock-up, or a lightweight prop that has to exist by the end of the lesson, it does the job.
The bead is thick and obvious. The bond peels off smooth plastic under side load. Call it assembly, not structure.
Keeping Heat Away From Thin Walls
Glue gun nozzles run hot enough to soften PLA. Thin walls deform first. Small printed details follow.
Use the smallest useful amount. A thin bead carries less heat than a puddle. Less heat, less warping. Bring the parts together promptly instead of letting hot adhesive sit on one face, and keep the nozzle itself off the print.
Test on a failed print when appearance matters. Wall thickness changes everything.
Supervision and Burn Safety
The nozzle burns. So does the melted glue. Younger students should not operate a glue gun without an adult beside them.
Stand the gun on a stable heat-resistant surface while it is plugged in. Route the cord away from the work area so the tool cannot be dragged off the table. Never touch fresh glue to check whether it cooled.
Method 4: 3D Pen Welding for Hidden Seams
A 3D pen can add a hot PLA reinforcement bead along an accessible seam, but the bead may sit on the surface rather than fully fuse with the printed walls. Use this method only for non-safety-critical repairs after an adult tests the filament and heat setting on a scrap piece. Do not rely on a 3D-pen seam as a verified structural weld without mechanical testing.
The seam is thicker than a CA line. It can be shaped once it cools. Think reinforcement, not cosmetics.
Welding From the Inside
If the model is hollow or open on one side, join the halves first and reinforce from behind. The outer surface stays clean. That is the whole trick.
Run a steady bead along the inside corner. Keep moving. No single spot should absorb enough heat to bow the wall. On a long seam, work in short sections and let each one cool.
Helmets, props, large shells, and sectioned school models all benefit.
Filling Gaps and Smoothing the Result
Build filler up gradually. Bridging a whole opening in one pass rarely works. Anchor the new PLA to both sides, let it cool, then add more.
Let the plastic cool fully before shaping it. Warm PLA smears. It also pulls away from the joint.
Start with a file only if the ridge is large, then move to finer paper. Watch out near thin walls, because sanding through the shell creates a new weak spot where you were trying to add strength.
Method 5: Heat Welding With a Soldering Iron
Heat welding softens the printed material itself and fuses the two faces. Done properly it produces a strong joint. Done carelessly it puts a hole through the model. There is not much middle ground.
Reserve it for hidden joints and interior corners. Strength outranks finish there.
How to Control the Heat
Fix the parts so they cannot shift. A moving seam welds unevenly. Clamp first.
Touch the hot tip to the joint in short passes. Work slowly enough to soften the plastic. Never hold the tip in one place. A good weld pulls material from both halves, not just one side laid over the other.
A dedicated plastic welding tip spreads heat more usefully than a standard soldering point. Either way, practise on scrap.
Reinforcing With Spare Filament
A length of leftover filament makes good filler. Lay it along the seam. Soften it with the tool, then push part of the new material into each side.
Aim for a wide connection, not a thin strip sitting on top. Several small passes beat one molten bead.
This is adult work. PLA melts through a thin wall in seconds. The same tool will happily burn a finger.
Method 6: Solvent Adhesives for Confirmed PLA Compatibility
Solvent bonding works differently. The liquid softens the plastic surface. As it leaves, the two softened faces knit into one seam.
PLA is harder to solvent-bond than ABS. Results shift with the filament formulation. Confirm compatibility, never assume it.
Why PLA Compatibility Varies
Filament is rarely pure PLA resin. Pigments, impact modifiers, and fillers all change how the plastic reacts. Two colours from one brand can behave differently. Test both.
Product names mislead too. A bottle labelled plastic cement may be formulated for styrene, acrylic, or PVC. Check the manufacturer’s compatibility list for PLA by name. Not listed? Test on scrap.
When to Skip Solvents Entirely
Skip them in a small closed classroom. Skip them on painted or coated models until you know how the chemical reacts with the finish. Skip them for untrained students.
For ordinary toys and school builds, super glue or epoxy is easier to control. Both are far less likely to ruin the print.
All Six Methods Compared
|
Method |
Strength |
Gap Filling |
Seam Visibility |
Adult Needed |
|
Super glue (CA) |
Good in tension, poor in peel |
Thin: none. Gel: minor |
Very low |
Yes for young kids |
|
Two-part epoxy |
Highest of the six |
Good |
Low to medium |
Yes, for mixing |
|
Hot glue |
Low |
Bridges rough surfaces |
High |
Yes, burn risk |
|
3D pen weld |
Medium to good, depends on bead width |
Good, built up in layers |
High outside, hidden inside |
Yes, heated tool |
|
Heat weld |
Good on wide internal welds |
Good with filler rod |
High |
Adult only |
|
Solvent bond |
Varies with formulation |
None |
Very low when compatible |
Adult only |
THE BEST REPAIR IS THE ONE YOU NEVER HAVE TO MAKE
Most emergency gluing traces back to two things. A print that failed halfway. Or a model split into pieces because it did not fit the build plate. Enclosed PLA printing, auto levelling, and a reviewed model library cut down on both. AOSEED builds kid-friendly 3D printers around exactly that. More time playing with finished toys. Less time repairing them at the kitchen table.
How to Make a Glued PLA Joint Stronger
A stronger glue does not create a stronger assembly. Geometry, contact area, and print orientation matter just as much. Sometimes more.
Same seam breaking again? Redesign the joint. Switching brands rarely helps.
Increase the Bonding Area
Two flat faces hold better than two thin edges. Where you control the model, design one section to overlap or nest inside the other. Area is strength.
A stepped joint, a sleeve, a flange, or a wide tab all give the adhesive more surface to grip. Force spreads through more plastic. On a broken part you cannot redesign, add a backing plate on the hidden side.
Add Pins, Tabs, and Interlocks

Mechanical features reduce how much work the glue has to do. Tabs, pins, sockets, and keyed joints stop parts sliding or twisting. They also make assembly easier, because you have a physical guide.
Round pins are simple to add to most models. Leave clearance for normal print variation. On an existing print, drill only where the wall can take a hole without splitting.
Reinforce Hidden Seams
The inside of a hollow model is free real estate. A PLA strip, a printed bracket, an epoxy fillet, or a 3D pen bead all spread load beyond the original seam. Use the space.
Several small braces beat one thick line of glue. Place them at joints and stress points. Resist filling the whole cavity, because weight added to a lightweight print creates its own problems.
Test Functional Parts Gradually
Start with light force. Watch for movement, cracking, or peeling. Sometimes the PLA fails before the glue does.
If the part carries weight or controls motion, ask whether a screw or bolt would be more predictable. Never rely on a glued hobby print where failure would hurt someone.
Common Problems When Gluing PLA
PLA joints fail for a short list of reasons. Find the cause. The second attempt usually holds.
|
What You See |
Likely Cause |
What to Do Next |
|
Glue peels cleanly off the plastic |
Dirty, glossy, or oily surface, or an incompatible adhesive |
Clean, scuff lightly at 220 to 400 grit, remove dust, retest on scrap |
|
Adhesive sticks to both sides but snaps through the middle |
Layer too thick, or the wrong product for the load |
Thinner layer, or switch to epoxy plus mechanical reinforcement |
|
Same seam keeps breaking |
Narrow end-to-end joint with almost no contact area |
Add an overlap, backing plate, pin, or internal brace |
|
White or cloudy haze around the joint |
CA blooming from excess adhesive and poor airflow |
Use less glue, keep the area ventilated, do not seal the part in a container while curing |
|
Parts drifted out of line while setting |
Unsupported joint, gravity, slow-curing epoxy |
Build a tape or cardboard jig, bond one section at a time, re-check shortly after clamping |
|
Glue squeezing out of the seam |
Too much adhesive or too much clamp pressure |
Thinner spread across the face, lighter clamping |
|
Joint feels firm but fails in play |
Handled before full cure |
Follow the label cure time, not the moment it stops feeling tacky |
Glue Safety for Toys and School Projects
Choose the adhesive for the person using it, not only for bond strength. What suits an experienced maker can be wrong for a second-grade classroom.
Read the label first. Then follow it on ventilation, skin contact, eye protection, storage, and disposal.
Ventilation and Workspace Setup

Indoor air holds more of this than people expect. EPA data on volatile organic compounds indoors shows concentrations running consistently higher inside than outside. Glues and adhesives are on the household source list. Elevated levels also linger after the activity finishes.
Open a window. Run an exhaust fan. Work near the door, not in a closed corner.
Keep the surface clear so bottles, cords, and clamps cannot be knocked over. Food and drink stay out.
Skin, Eyes, and Adult Supervision
Cyanoacrylate irritates. The NIOSH pocket guide lists the eyes, skin, and respiratory system as target organs for cyanoacrylate exposure. Symptoms include eye, skin, and nose irritation, watering eyes, and a runny nose.
Repeat exposure carries a separate risk. A published review of acrylate adhesives covers super glue among them and describes rising sensitization risk in women and children. Keep small hands out of the bottle entirely. That beats teaching care.
Use an applicator, never a finger. Wear eye protection when the label calls for it. Same when cutting, sanding, or drilling a glued part.
Before You Hand the Toy Back to a Child
Wait for full cure. Then check the repair as an object, not a seam.
Sharp glue edges get trimmed. Loose fragments come off. No exceptions. Small pieces are the real concern here. The CPSC small parts ban exists to prevent choking, inhalation, and swallowing injuries in children under three. A repaired toy heading back to a toddler deserves that second look.
|
WARNING Store adhesives where children cannot reach them. The EPA specifically advises keeping these products out of reach of children and pets, since gases can escape even from closed containers. |
When to Glue and When to Reprint
Gluing is not always the shortcut. Sometimes the printer is faster.
Glue it when:
- The break is clean and the two faces still fit together.
- The model was intentionally sectioned to fit the build plate.
- The part is decorative, or the load on the joint is light.
- A reprint would take longer than the cure time you have.
- The piece is painted, finished, or has sentimental value.
Reprint it when:
- The plastic shattered into fragments or crumbled at the edge.
- The joint sits at a hinge, axle, or anything that carries real force.
- The wall is too thin to drill, pin, or brace.
- You have already glued the same seam twice.
- The part is small, quick, and going back to a young child.
Reprinting is easy to underrate. A small toy part finishes in under an hour on a beginner printer built for younger kids. A fresh part with correct geometry always outperforms a repaired seam on a moving joint. Keep a spare spool on the shelf and the decision becomes a habit.
Conclusion
Match the method to the job and PLA repairs stop being a gamble. Super glue for small close-fitting parts. Epoxy for weight or an imperfect fit. Hot glue for the display due this afternoon.
A 3D pen or a heat weld earns its place on hidden seams where you can build a wide bead. Solvents stay on the shelf until a manufacturer names PLA.
The fundamentals do the heavy lifting. Dry-fit, clean, sand the mating faces, clamp properly, and let the joint cure all the way. Then widen the contact area or add a pin, because glue should support a joint rather than be the joint.
For toys and school projects, choose the easiest method that gives you enough strength, and test unfamiliar adhesives on scrap PLA first. AOSEED builds creative tools families keep using after the first print. The X-MAKER JOY starts at $229. It ships with enclosed PLA printing, auto levelling, and a library of over 8,000 reviewed models. Fewer failed builds, fewer repairs. More finished toys that survive being played with.
FAQs
What is the best glue for PLA parts?
For most small and medium PLA parts, cyanoacrylate super glue is the easiest starting point. It sets in seconds. A thin layer is enough, and it works well when two rigid printed faces already fit closely together.
The answer changes when the joint has gaps or needs positioning time. Two-part epoxy stays workable longer. It forms a thicker layer and spreads stress across a wider area, which suits larger sections and anything carrying weight. Hot glue covers quick classroom builds. A 3D pen or a heat weld adds material to an accessible seam.
Preparation matters as much as product choice. Clean, dry, well-fitting faces give any adhesive a better chance. Skip that and nothing helps.
Practical tip: use super glue for close-fitting toys and models, and switch to epoxy the moment you need working time or gap filling.
Is E6000 or superglue better for PLA?
Super glue is usually the better pick for small rigid PLA pieces needing a fast narrow bond. Flexible craft adhesives of the E6000 type make more sense when the joint should move slightly and you can wait out a much longer cure.
The behaviour is the real difference. CA grabs within seconds and dries hard. That suits miniatures, figures, and snapped tabs, but it leaves almost no adjustment window. Flexible adhesives stay softer and go on thicker. They take far longer to reach full strength, which makes them poor on tiny visible seams. Compatibility also varies by formula. The label decides.
For a detailed PLA model, start with CA. For PLA to fabric or PLA to metal, test the flexible adhesive on scrap.
Practical tip: if the joint needs to bend at all, CA is the wrong answer no matter how convenient it is.
Can I glue PLA with superglue?
Yes. Cyanoacrylate is one of the most common ways to join PLA prints. It performs best when the two surfaces sit closely together.
CA cures into a hard joint, which matches PLA’s rigid nature. Thin formulas wick into narrow seams. Gel formulas give more control on slightly uneven or vertical faces. The fast set helps on quick repairs and hurts on large assemblies, because the glue starts holding before you have finished aligning anything.
Clean and dry-fit the faces. Apply a small amount. Press the parts together in the correct position, then leave the joint alone for the cure time on the bottle. For wide gaps or heavily stressed joints, switch to epoxy or add mechanical reinforcement rather than piling on more glue.
Practical tip: mark the alignment with a pencil before the glue comes out.
What are common problems when gluing PLA?
The usual list is weak adhesion, crooked alignment, gaps between parts, glue squeezing from the seam, and a white haze around cyanoacrylate joints. Most trace back to four things. Dirty surfaces, poor fit, too much adhesive, or handling the part before it cured.
Super glue is the least forgiving because it sets so quickly. Excess CA leaves hard ridges and blooming. Poor airflow makes that worse. Slower epoxy creates a different failure: an unsupported section drifts out of position while the resin is still soft.
Prevention is mostly preparation. Sand uneven mating faces, clear the dust, dry-fit the pieces. Have tape or clamps ready before you open the bottle.
Practical tip: if the same seam keeps breaking, improve the fit or add a brace instead of adding another thick layer.
Is Gorilla Glue safe on PLA?
That name covers several different adhesives. The specific product matters more than the brand. A cyanoacrylate super glue from that range behaves nothing like an expanding polyurethane formula.
CA versions suit small close-fitting PLA joints. Expanding polyurethane glues foam as they cure. Unclamped, they can push parts apart, which is a real problem on a delicate printed model. Cure times, surface requirements, and plastic compatibility differ across the range, and product pages do not always name PLA specifically.
Treat "bonds plastic" as a different claim from "safe for every toy use". Follow the label. Never assume two products from one brand behave the same on a print.
Practical tip: test the exact product on a failed print before it touches a finished toy.
How do you glue PLA printed parts together?
Start by pressing the pieces together with no adhesive. Check fit and angle. Clean and dry the mating faces. Sand lightly if they are glossy or ridged, then clear the dust. Pick the adhesive based on size and use.
Apply a small controlled amount rather than flooding the seam. Bring the parts together and clamp them in the correct position. Check alignment from the front, the side, and above. Do it before the glue firms up. Leave the joint undisturbed for the full cure period the manufacturer lists, which can run to a full day on some products.
For a stressed assembly, improve the joint itself. Wider mating surfaces, internal braces, tabs, or pins all reduce how much the adhesive carries.
Practical tip: set up your clamps or tape before applying glue, not after.
Does Elmer’s glue stick to PLA?
Not really. White school glue is a poor choice for a permanent PLA-to-PLA joint. PVA adhesives are designed around porous materials such as paper, card, wood, and fabric, and a printed PLA surface is hard and largely non-absorbent.
It may dry around a part and appear to hold at first, especially on a lightweight craft build. Appearing to hold is not the same thing. Peeling, impact, and repeated handling all test it differently. School glue still earns a place. Attaching a PLA piece as decoration to cardboard, paper, or a poster board display works fine.
For a broken printed toy, use CA or a suitable epoxy.
Practical tip: save white glue for low-stress classroom craft work where easy cleanup matters more than strength.
How strong is superglue on PLA?
Strong enough for most small repairs. There is no single number that applies to every print. Bond performance shifts with the CA formula, the contact area, surface preparation, print orientation, layer adhesion, and the direction of the applied force.
A wide flat joint bonded with a thin even layer holds well under a straight pull. The same adhesive on a narrow tab that gets twisted or peeled sideways fails much sooner. Direction matters. In some assemblies the printed layers separate before the glue line does. That tells you the joint design was fine. The print orientation was not.
For a stronger repair, increase the contact area and keep the surfaces clean. Add a pin, an overlap, or a hidden brace on anything that gets used rather than displayed.
Practical tip: on a toy that gets handled daily, reinforce a narrow super-glued joint instead of trusting the glue line by itself.
Sources
- Centers for Disease Control and Prevention, NIOSH, “NIOSH Pocket Guide to Chemical Hazards: Methyl-2-cyanoacrylate”
- U.S. Occupational Safety and Health Administration, “OSHA Technical Manual, Section III, Chapter 1: Polymer Matrix Materials”
- U.S. Environmental Protection Agency, “Volatile Organic Compounds’ Impact on Indoor Air Quality”
- U.S. Consumer Product Safety Commission, “Small Parts and Choking Hazard Labeling FAQs”
- National Library of Medicine, PMC, “A review of acrylates: super glue, nail adhesives, and diabetic pump adhesives increasing sensitization risk in women and children”
- National Library of Medicine, PMC, “Accidental Adhesion of Both Hands with Super Glue”






Further reading

Thanksgiving STEM Activities for Kids: Table Projects and Simple Engineering Challenges

Halloween STEM Activities for Kids: Spooky Builds That Teach Real Science

STEM Crafts for Kids: Build, Decorate and Test



