

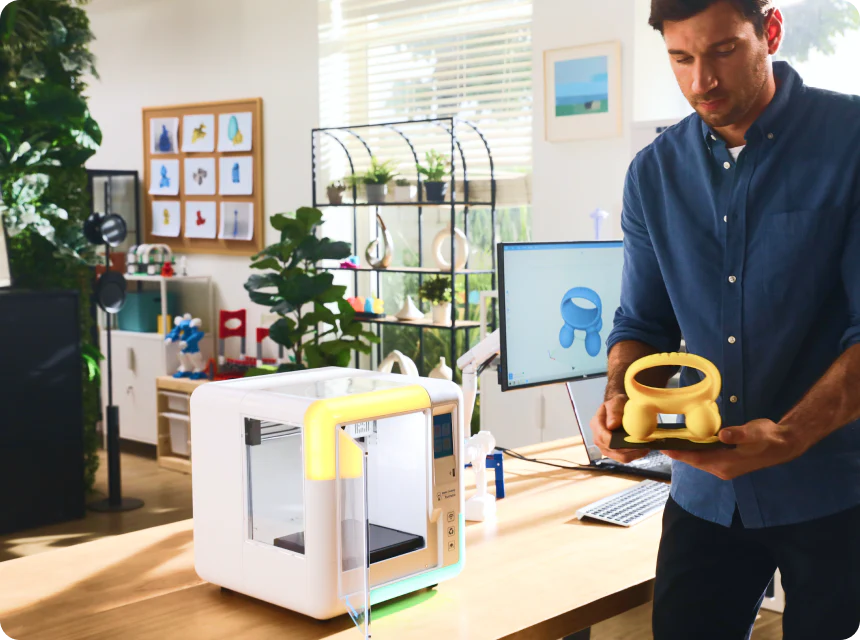
First Print Checklist for Parents Using AOSEED
The printer arrived. The children are excited. The box is open. And for about 30 seconds the parent is the only person in the room who has no idea what happens next.
This is the moment the first print checklist is designed for. Not a technical manual. Not a full explainer. A practical, sequential list of what to do — in order — so that the first session ends with a child holding a finished object rather than a parent troubleshooting a failed print.
The checklist below is organized into five zones: workspace setup, filament loading, file selection, active printing, and post-print care. Each zone has between three and five checks. Complete all zones in sequence and the first print will succeed. At AOSEED, the session structure described in this guide is the same one that produced a successful first print for families of every age range and prior experience level.
|
5 zones Complete all 5 → first print succeeds |
20 checks Total across all zones |
10 min Setup time before first print starts |
PLA only The right material for every first session |
What Is 3D Printing? — Quick Parent Explainer
|
What is 3D printing? |
What does it feel like to the child? |
|
A 3D printer reads a digital file and deposits plastic in thin horizontal layers — building from the bottom up until the object is complete. Home printing uses FDM (Fused Deposition Modeling) — the most accessible and family-safe format. The printer melts a thin strand of plastic and places it precisely, layer by layer. |
They choose the model from the app and press start They watch the object appear through the observation window They wait for cool-down, then hold the finished object They decorate it and decide where it will live |
Essential Steps to Take Before Printing with AOSEED

Community guidance from the first print checklist for 3D printers compiled by experienced makers consistently points to the same finding: most first print failures are not equipment failures. They are setup failures. Something was skipped in the preparation phase that would have taken under two minutes to complete. The zones below close every common setup gap.
Zone 1 — Workspace and Printer Setup

|
ZONE 1 · WORKSPACE AND PRINTER SETUP |
|
Level surface Place the printer on a stable, level surface. A wobbling printer produces rough first layers and may produce failed prints on longer sessions. |
|
Away from drafts Move the printer away from fans, air conditioning vents, and open windows. Drafts during printing cause layer separation and warping. |
|
Power connected Connect the printer to power. Do not use extension cords with multiple other devices. A dedicated socket is best. |
|
Enclosure clear Open the enclosure door and verify the interior is clear of packaging material, loose filament ends, or any objects from a previous session. |
|
App connected Open the AOSEED app on your device. Confirm the printer is connected and responds to the app. If this is the first time, follow the app's pairing instructions. |
Zone 2 — Filament Loading

|
ZONE 2 · FILAMENT LOADING |
|
PLA selected For every first session, use PLA. Non-toxic, plant-based, low odor. The right material regardless of the project. Do not experiment with other materials in the first session. |
|
Spool inspected Check the spool for tangles before loading. Unwind 20–30cm by hand and confirm it runs freely. A tangled spool during printing is the most common cause of mid-session stops. |
|
Filament tip prepared Snip the tip of the filament at a 45-degree angle with scissors. A clean angled tip feeds through the loading path without catching. |
|
Filament loaded and confirmed Feed the filament through the loading path as shown in the app. Wait for the app confirmation that filament is detected. Do not proceed without this confirmation. |
|
Purge run if needed If this is not a fresh spool or there is a color change, run the app's purge cycle — 5cm of filament is extruded to clear the previous color. Skip for fresh spools. |
Materials Reference — PLA vs PETG

|
|
PLA — Recommended for All First Prints |
PETG — For Active Toys and Older Kids |
|
Origin |
Plant-based — corn starch or sugarcane |
Petroleum-based polymer, food-grade safe |
|
Toxicity |
Non-toxic. Low odor at print temperature |
Non-toxic. Slightly more odor than PLA |
|
Handling after print |
Cool to touch quickly — safe in 5 min |
Slightly longer cool-down — 8–10 min |
|
Durability |
Good for display, moderate play |
Higher impact resistance — better for active toys |
|
Best for |
Every first print. All ages. All project types |
Race cars, fidget mechanisms, creation kit parts |
|
Storage |
Cool dry place — reseal after use |
Same — especially important in humid climates |
Zone 3 — File Selection and First Project

|
ZONE 3 · FILE SELECTION AND FIRST PROJECT |
|
First project selected For the very first session, choose the fastest project available — a spinning top (5 min) or ring whistle (15 min). These produce an immediate finished object and build session confidence before attempting longer prints. |
|
File confirmed in app The model should be visible in the app's print queue before starting. Confirm the model name, print time estimate, and filament color are correct. |
|
Print time acknowledged Note the estimated print time and share it with the child. A visual timer set to the print time reduces 'when is it done?' questions during the session. |
|
Decoration supplies ready Set out paint markers, stickers, or whatever decoration supplies are available. These should be visible and accessible before the print starts — not hunted for during the cool-down phase. |
First 3D Printing Ideas — Projects by Session Length
|
⚡ Quick Wins (under 20 min) |
Strong First Sessions (20–45 min) |
Second-Week Projects (45–90 min) |
|
Spinning top |
Print-in-place puzzle |
Flexi animal figurine |
|
Ring whistle |
Name keychain |
Pull-back race car |
|
Fidget ring |
Mini animal figurine |
Growing block set (1 block) |
|
Small coin or token |
Custom game piece |
STEM gear mechanism |
The AOSEED Toy Library covers every category in the grid above with multiple variants per type. Filter by print time in the app to find the right project for the child's available patience window on any given day. Weekly additions ensure the library grows alongside the family's session history.
Step-by-Step Checklist for First-Time 3D Printing with AOSEED
Roland DG's guidance on the pre-print checklist for 3D printers identifies the final walkthrough before pressing start as the most important single step in the first-print checklist. After all the preparation zones, a 60-second final check prevents the most common immediate failure modes.
Zone 4 — Active Printing

|
ZONE 4 · ACTIVE PRINTING |
|
Final safety zone check Before pressing start: enclosure door closed, no objects on or near the printer, child briefed on 'observation window only — no touching during printing.' |
|
Start pressed Press the start button in the app or on the printer. Stay with the printer for the first 3–5 minutes to confirm the first layer is adhering correctly. |
|
First layer confirmed The first layer should be smooth, flat, and sticking to the plate. If it looks rough, raised at edges, or is not adhering, pause and re-check the plate cleanliness and level. |
|
Print monitored Check in every 10–15 minutes. You do not need to watch continuously — the printer runs independently. One mid-print visual check is sufficient for most sessions under 60 minutes. |
|
Child engaged during wait While the printer runs, the child can draw a habitat for the animal being printed, plan what color to paint it, or choose next week's project in the app. Purposeful wait time reduces impatience. |
Zone 5 — Post-Print Care

|
1 |
Cool-down confirmed Touch the object only after the cool-down timer finishes. 5 minutes after the print completes. |
|
2 |
Surface check Run a finger along all surfaces. Sand any rough points. Verify no part is small enough to be a choking hazard for the youngest child. |
|
3 |
Filament sealed Reseal the filament bag or box after every session. Moisture shortens filament life and causes rough print surfaces. |
|
4 |
Decoration supplied Set out paint markers or stickers before the cool-down ends so the decoration phase starts immediately. |
|
5 |
Object displayed Place the finished object on the display shelf. Name it. The session is complete when the object is displayed. |
|
✅ The Zone 5 Rule The session is not complete until all five after-session checks are done. The cool-down check keeps children safe. The filament seal keeps the next session high quality. The display moment closes the session with social recognition that reinforces the maker habit. |
Best Practices for Monitoring Kids During 3D Printing Projects

An enclosed printer design handles the physical safety automatically — the nozzle, heated bed, and moving belts are inside a sealed chamber. Parental monitoring during a session is therefore about the child's creative experience rather than active safety management. These two practices produce the most positive first session outcomes.
Safety Measures for Kids
|
✓ |
Observation window only — throughout the session: The child's interaction with the printer during printing is through the observation window. The door stays closed until the cool-down check confirms the print is ready. This boundary is the same across every session and every age. |
|
✓ |
Cool-down confirmed before any touching: Five minutes after the print finishes, the parent touches the object first to confirm it is safe to handle. This single step prevents the most common first-session minor incident: a child picking up an object before it has fully cooled. |
|
⚠ |
Sharp edges check before decoration phase: A brief surface check is Zone 5 step 2. For younger children, verify that no part is under 25mm in any dimension. Sand any rough points with fine-grit sandpaper before handing the object to the child. |
|
✓ |
PLA only — no resin, no ABS, no chemical processes: Every safety property of the first session is built around PLA. Non-toxic, low-odor, plant-based. A first session that uses any other material introduces variables that PLA removes. No first session needs any material other than PLA. |
Encouraging Kids to Design
The AOSEED app's beginner design tools are the correct entry point for children who want to move beyond pre-made models. Starting point: modify an existing model by adding a name, changing a size, or choosing a color within the app before printing. This is genuine design work without blank-canvas anxiety.
Design progression by session number:
- Sessions 1–5: Choose from the Toy Library. No design required — creative decision is the color choice.
- Sessions 6–10: Use the app's name or icon tools to add a personal element to a pre-made model.
- Sessions 11–20: Use the beginner design screen to adjust size, shape, or add a simple element.
- Session 20+: Use the full design workflow for original model creation — text, basic 3D shapes, export.
Common Troubleshooting Tips for Parents
Most first-session issues resolve with one of the six fixes in the table below. If the issue does not appear here or persists after the suggested fix, see the Learning Center in the app or contact the AOSEED support team.
Fixing Print Failures
Troubleshoot Quick-Reference
|
What You See |
Most Likely Cause |
Quick Fix |
|
Print not sticking to plate |
Plate not clean, or nozzle too far from surface |
Wipe plate with damp cloth. Re-run auto-leveling in app. Restart session. |
|
Filament comes out tangled or kinked |
Spool tangle or filament not loaded straight |
Open filament bay. Unspool 10cm manually. Trim at 45°. Re-load. |
|
Print stops mid-way |
Filament ran out, or session interrupted |
Check spool level before each session. Resume if app offers continue — otherwise restart with a small project. |
|
Print looks rough or stringy |
Print temperature slightly off for this filament |
Check filament type in app matches the spool loaded. PLA and PETG need different temperatures. |
|
First layer OK but upper layers peel |
Draft or vibration during print |
Move printer away from fan, window, or air vent. Ensure table is not shaking. |
|
Nothing comes out at start |
Air bubble in filament path or cold nozzle |
Wait for full heat-up. Run the purge cycle from the app. Try again. |
When to Seek Help
Contact AOSEED support when: the printer displays an error code that persists after a full restart; the nozzle does not reach operating temperature within 3 minutes of starting; or there is an unusual sound (grinding, clicking) during movement that was not present in previous sessions. Do not disassemble any part of the printer before contacting support.
|
AOSEED Learning Center and Support The AOSEED app includes a Learning Center with step-by-step guided troubleshooting for every common first-session issue. Open the app, tap the Learning Center icon, and follow the guided flow. For issues not covered there, the AOSEED support team responds to all tickets within 24 hours. |
What Is 3D Printing — For Common Family Questions
If family members (including grandparents or siblings) ask what the printer does: it is a machine that reads a digital file and builds a physical object one thin layer at a time, from the bottom up. The family-use version melts a small strand of plastic at a controlled temperature and deposits it precisely, building a car or animal or puzzle from nothing in under an hour. The child chooses the design. The machine executes it. The child decorates the result.
The most accurate answer to 'what is 3D printing?' for a first-session family is simply: it is the machine that turns the child's choice into a physical object they can hold.
Conclusion
The first print checklist exists because first sessions do not fail for complicated reasons. They fail because Zone 1 was incomplete, or the filament tip was not prepared, or the cool-down was skipped. Each of those takes under two minutes to fix in advance.
Complete all five zones. Choose the shortest project for session one. Stay with the printer for the first five minutes. Let the child press start and mark the cool-down timer. Celebrate the finished object together.
Session two is easier. Session five is something the child initiates independently. The checklist is the tool that gets you there.
For parents choosing their first printer for a family maker session, AOSEED 3D printers for kids shows both current models with age guidance — useful for matching the printer to the session structure in this checklist.
FAQs
What is the first step in the 3D printing process for kids?
Zone 1 of this checklist: workspace setup and printer placement. The printer goes on a stable, level surface away from drafts, connected to a dedicated power socket, with the interior clear of packaging. This zone takes under 5 minutes for a first-time setup and under 1 minute for every subsequent session. The child's role in Zone 1 is to watch — Zone 3 (file selection) is where their creative decisions begin.
What should you check before printing?
The five zone checks in this guide cover every pre-print verification that affects first session success: workspace stability, filament loading quality, file selection, final safety confirmation, and print start monitoring. The most commonly skipped check in first sessions is the filament tip preparation — a 30-second step that prevents the most frequent loading failure.
What is preflight printing?
In commercial printing, preflight is the verification process that happens before a print job is sent to the press — checking that the file is correctly formatted, the colors are set up for print output, and the settings match the physical material being used. For 3D printing with AOSEED, the equivalent is Zone 2 and Zone 3 of this checklist: filament loaded correctly, file confirmed in the app, print time acknowledged, and decoration supplies ready. Completing these three steps before pressing start is the 3D printing preflight.
How do I ensure my child's safety during 3D printing?
Four specific practices cover the full safety requirement for a family 3D printing session: PLA filament (non-toxic, low-odor, no ventilation needed), enclosed printer design (nozzle and heated bed inside sealed chamber), observation-window-only rule during printing (child watches through window — does not reach inside), and Zone 5 cool-down confirmation (parent touches object first before passing to child). All four are consistent practices across every session, not special precautions.
What is the best material for 3D printing with kids?
PLA for every first session and most sessions after that. It is plant-based (corn starch), non-toxic, produces minimal odor at printing temperature, and requires no ventilation. It comes in a wide range of colors and produces smooth, decoration-ready surfaces. PETG is the right upgrade when the child is printing functional toys — race cars, fidget mechanisms, creation kit components — that will be used actively every day and need more impact resistance than PLA provides.
How long does a 3D print typically take?
The range is wider than most first-time parents expect: a spinning top or ring whistle prints in 5 to 15 minutes; a name keychain prints in 15 to 20 minutes; a flexi animal figurine prints in 30 to 60 minutes; a pull-back car prints in 45 to 90 minutes; and a multi-part creation kit component can take 60 to 180 minutes. For a first session, choose a project that finishes before the child's patience window closes. Look up the print time estimate in the app before the session starts and set a timer at the beginning of Zone 4.
Can kids design their own 3D prints?
Yes, using the AOSEED app's beginner design tools. The practical entry point is modification rather than original design: the child takes an existing model and adds their name, adjusts a size, or changes a detail. This produces a genuinely personalized object without requiring blank-canvas design skills. Full original design (creating a model from scratch using 3D shapes) is achievable by most children after 15 to 20 sessions, when they have internalized the session structure and have enough design confidence to attempt something original.
What 3D printing ideas are best for kids?
Session 1: spinning top or ring whistle. Session 2: name keychain. Sessions 3–5: animal figurine or print-in-place puzzle. Sessions 6–10: pull-back car, custom game piece, or fidget mechanism. Session 10+: growing block collection, personalized gift, or STEM gear model. The right idea for any session is the one that matches the child's current patience window and the parent's current involvement level — not necessarily the most impressive project available.
How do I fix a failed 3D print?
Check Zone 5 of this checklist first: was the plate clean before the session started? Was the first layer monitored? Was the filament loaded with the tip prepared at a 45-degree angle? Most first-session failures trace to one of these three. The troubleshoot table in the Common Troubleshooting section above covers the six most common symptom-and-fix pairs. If none of the six matches the issue, open the Learning Center in the app for guided troubleshooting.
Sources
- 3D Printing Reddit community — First Print Checklist for 3D Printers, First Print Checklist for 3D Printers, 2026.
- Roland DG — Pre-Print Checklist for 3D Printers, Pre-Print Checklist for 3D Printers, 2023.
- Formax Printing — Quick Checklist for Printing (pre-print preparation principles), Quick Checklist for Printing, 2023.
- 3D Printing Experts — Pre-Print Checklist for Beginners, Pre-Print Checklist for Beginners, 2024.
- 3D Hubs — Beginner's Guide to First 3D Prints, Beginner's Guide to First 3D Prints, 2024.



Further reading

Graduation Gifts for Kids: Keepsakes for Kindergarten to Fifth Grade

How to Clean a 3D Printer: A Routine for Families

3D Printer Filament Holder: Options, Setup and a Version You Can Print


