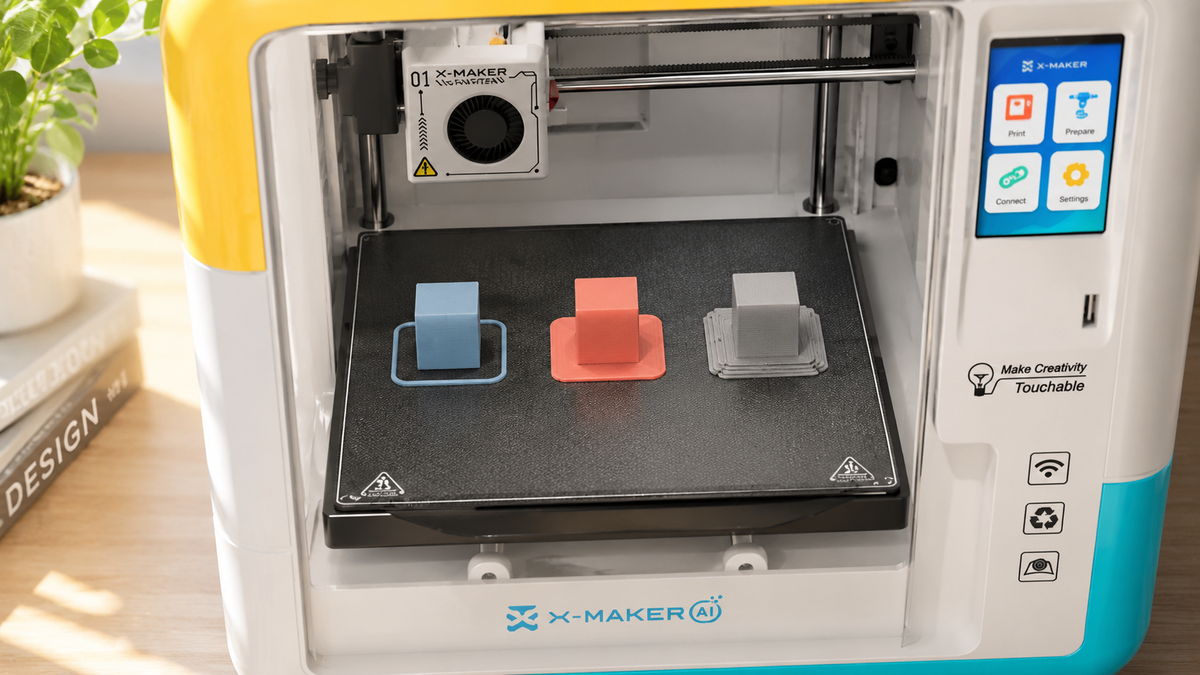
Brim vs Raft vs Skirt: 12 Beginner 3D Printing Scenarios Compared
Use a skirt to prime flow and inspect the first layer, a brim to add attached edge contact, and a raft only when a separate printed base solves a problem that remains after setup and orientation checks.
A skirt normally prints around the model without touching it. A brim attaches to selected first-layer edges, while a raft places multiple printed layers beneath the model. Names, gaps, and available options vary by slicer, so confirm the first layers in the preview.
Choose the least intrusive aid that addresses the observed symptom. More plastic cannot correct a dirty plate, unsuitable nozzle gap, wrong profile, strong draft, damaged surface, or unstable orientation.
A skirt cannot stabilize a narrow footprint because it is detached from the model. If a tall part remains unstable after the first-layer setup is verified, compare a brim, slower motion, or a different orientation before escalating to a raft.
The 12 scenarios below begin with the visible symptom, then compare the likely aid, settings to verify, removal cost, and reasons to stop and repair the setup instead.
|
What is happening on your plate |
Start with |
Why |
|
Print already sticks. You only want to see filament flowing first. |
Skirt |
Usually adds relatively little material and provides an early flow and first-layer check without touching the model. |
|
A corner or an edge lifts partway through. |
Brim |
Bonds to the base and adds edge contact; success still depends on the first-layer setup and cause of lifting. |
|
Tall model on a tiny foot, or it rocks as the nozzle climbs. |
Brim first, raft if it still moves |
A brim adds a thin attached footprint; a raft creates a separate platform and usually adds more material and cleanup. |
|
A sensibly sized brim already failed, and plate and offset both check out. |
Raft |
Creates a printed platform under the model; test it only after plate and offset checks. |
|
Bottom face has to look clean. |
Skirt, or a brim you trim carefully |
A raft prints the model on plastic, so the underside comes out textured. |
Brim vs Raft vs Skirt: What Actually Changes

Contact is the key distinction. The skirt does not touch the model. A brim fuses to the outer edge of the first layer, while a raft sits underneath so the part starts on a printed platform rather than directly on the build plate.
The main trade-offs follow from that contact difference: adhesion support, added filament and time, cleanup, and the finish on the bottom face.
Material-extrusion printers build line by line and layer by layer, as NIST describes. Because the rest of the model depends on the first layer, a small priming loop can be useful when it reveals flow or nozzle-gap problems before the part starts.
Skirt: Priming, Not Gripping
One or more loops, one layer tall, printed with a deliberate gap between the loop and the part. It goes down first. The model follows.
A skirt also provides an early inspection pass. Watch for thin patches, rounded beads, or a missing stretch on one side of the plate; these signs can reveal flow or nozzle-gap problems befan ore the model begins.
Adding loops to a separated, one-layer skirt increases priming and inspection time but does not add bonded area to the model. If the goal is edge adhesion, choose a brim or another validated first-layer fix.
Brim: Extra Bed Contact at the Edges
Same shape as a skirt with the gap closed. Several lines run outward from the base at first-layer height, fused to the model. Fused matters.
A brim widens the footprint, which may help a lifting edge or an unstable narrow base. It does not correct a dirty plate, an unsuitable nozzle gap, strong drafts, or a severely distorted build surface.
The part still prints directly on the build surface, so the underside keeps the plate's usual finish. A brim normally adds less material and time than a raft, but the exact difference depends on width, model size, and profile.
Cleanup is the cost. A brim has to come off. Set it badly and it leaves a lip you will be trimming with a blade.
Raft: A Plastic Floor Under the Whole Print
A platform. Several layers of it, printed beneath the model, with a small air gap between the top of the platform and the bottom of the part. The gap is deliberate.
Thick slow base layers bond to the plate. Smoother top layers give the model something flat to start on. Separation comes later, and the gap is what allows it.
A raft creates two controlled interfaces: raft-to-build-plate and model-to-raft. It can broaden the contact area and provide a more uniform interface surface, but both interfaces still depend on validated profile, temperatures, flow, and separation settings.
Costs are real. More filament. More minutes, more prying, and a bottom face rougher than anything printed straight onto the plate.
|
Factor |
Skirt |
Brim |
Raft |
|
Touches the model |
No |
Yes, at the outer edge |
Yes, the whole underside |
|
Adhesion help |
None |
Moderate, focused on edges |
Typically the most adhesion help of the three |
|
Extra filament |
Very little |
A thin ring |
Several layers across the full base |
|
Extra print time |
Low |
Low to moderate |
Highest and profile-dependent |
|
Cleanup |
Lift it off the plate |
Peel, then trim the lip |
Pry, then sand if it matters |
|
Bottom finish |
Unchanged |
Unchanged except at the edge |
Textured, sometimes uneven |
|
Best beginner use |
Nozzle priming and a first-layer look |
Lifting corners, narrow bases, mild warping |
Tiny footprints, repeat failures, marked plates |
|
Use the least intrusive adhesion aid that solves the problemStart with a skirt to check flow, move to a brim for extra edge contact, and reserve a raft for cases that need a separate base. This sequence keeps setup problems visible and limits added material and cleanup. |
12 Beginner Scenarios, Sorted by the Problem
A wide model that already sticks needs a different aid from a tall tower with a narrow footprint. Name the symptom and confirm the first layer before choosing among a skirt, brim, or raft.
The 12 scenarios below are a decision framework based on common first-layer symptoms and the cited adhesion guidance; they are practical troubleshooting examples, not a measured sample of beginner use.
|
# |
Scenario |
Pick |
Reason |
|
1 |
PLA model, wide base, already sticking |
Skirt |
If the first layer is already stable, a brim may add cleanup without solving a visible problem. |
|
2 |
New spool loaded, or first job of the day |
Skirt |
Can help confirm steady flow after a material or nozzle change; follow the printer's purge instructions. |
|
3 |
You want a fast read on nozzle height |
Skirt |
The loop shows squish differences side to side. |
|
4 |
Filament is tight and the file is reliable |
Skirt |
Least plastic of the three, nothing to trim. |
|
5 |
Sharp corners curling upward |
Brim |
Adds edge contact around the corners; plate, temperature, drafts, and orientation still matter. |
|
6 |
Tall narrow model wobbling as the nozzle rises |
Brim |
Widens the base without a platform underneath. |
|
7 |
Small but clean contact patch |
Brim |
Cheap way to make a tiny footprint usable. |
|
8 |
Large flat part lifting at the perimeter |
Brim |
Adds contact around the perimeter; confirm the cooling and first-layer cause as well. |
|
9 |
A sensibly sized brim already failed |
Raft |
Compare a raft only if the brim stayed attached and setup checks pass. |
|
10 |
ABS or another warp-prone material, shrinking as it cools |
Raft |
May provide a more forgiving interface, but material profile, enclosure, and cooling remain important. |
|
11 |
Footprint so small the model barely stands |
Raft |
Replaces a tiny foot with a broad platform. |
|
12 |
Plate carrying light scratches or dull patches |
Raft |
A raft may bridge minor surface inconsistency temporarily; damaged plates still need cleaning, inspection, or replacement. |
Scenarios 1 to 4: When a Skirt Is All You Need

- Wide-based PLA model that already sticks. A skirt may be enough to confirm flow. Adding a brim or raft would add material and cleanup without addressing a visible adhesion problem.
- New spool just loaded or nozzle recently changed. A few skirt loops can help confirm steady flow before the part begins; use the printer and material instructions when purging a different color or material.
- Checking nozzle height across the plate. Watch the loop travel. If one side is flattened while the other remains round and barely attached, the nozzle gap is not even from left to right. Correct that setup issue before adding more adhesion material.
- Trying to waste less plastic. A few lines, one layer tall, nothing to cut off afterwards. On a file you have printed before, that is the whole toolkit. No additions needed.
Scenarios 5 to 8: When a Brim Solves It

- Sharp corners curling. Cooling stress can concentrate at bottom corners, and published work describes warpage arising from temperature differences within the print and at the plate. A brim can add edge contact, but plate preparation, temperature, drafts, and orientation still need checking.
- Tall narrow model that wobbles. Sideways force at the top works on a small base like a lever as the nozzle climbs. Widening the base usually settles it. Not always. If the part still shifts, drop print speed before adding a raft.
- For a roughly 12 mm-wide foot, an 8 mm outer brim on each side can expand the overall footprint to about 28 mm. Confirm the actual shape, brim width, and contact area in the slicer preview before printing.
- Large flat part lifting at the perimeter. Big flat bottoms build stress as they cool, and the edges often lift first. A brim adds contact around the outside while the part itself stays on the plate.
Bed temperature is the other half of that last one. One framework study on PLA process optimization notes that bed temperature and bed surface both work to increase first-layer adhesion, that PLA will run on an unheated plate, and that a heated one can cut distortion and shrinkage by reducing the thermal gradient between nozzle and print surface. Two levers, not one.
Scenarios 9 to 12: When a Raft Earns Its Cost

- A sensibly sized brim already failed. Check whether the brim itself stayed attached. If it lifted too, correct the setup first; if it stayed attached while the part separated, compare a raft or a different orientation with a compact test.
- ABS commonly needs stricter thermal and exposure controls than PLA. Use it only if the exact printer and filament documentation support it, with responsible adult operation, validated enclosure and bed settings, draft control, and effective ventilation or filtration. Treat a raft as an optional profile tool, not a substitute for those controls.
- Footprint of a few square millimetres. Warping is not the problem here. There is simply nothing to hold. A raft swaps that for a broad platform. The model then bonds to the platform instead of the plate.
- Minor surface variation does not make a raft a repair. Its first layers still must adhere to the plate. Clean and inspect the surface according to the manufacturer, run a compact test only if the plate remains within service guidance, and replace a damaged or distorted build surface when instructed.
Same Question, Sorted by Filament
Material shrinkage tendency is one factor in the choice, alongside footprint, first-layer setup, plate surface, enclosure, drafts, and the tested material profile.
|
Filament |
How much it pulls in as it cools |
Usual starting point |
Escalate to |
|
PLA, wide flat base |
Low |
Skirt |
Brim, only if an edge lifts |
|
PLA, tall or narrow part |
Low, but the base is the weak point |
Brim |
Raft, if the foot is tiny |
|
PETG |
Moderate |
Skirt |
Brim for corners and long edges |
|
ABS |
High |
Brim, wide |
Raft, plus a stable enclosed temperature |
A PLA-only workflow removes some material-specific decisions, but PLA can still lift because of geometry, plate condition, nozzle gap, temperature, or drafts. Use the table as a diagnostic starting point, not a product recommendation.
Slicer Settings That Actually Matter

Build plate adhesion, or something close to that wording, is where most slicers file all three. Labels shift between programs. Behaviour does not.
A small group of controls covers most adhesion-aid decisions. Start from the tested profile, change one value per test, and keep each adjustment within the printer and slicer guidance.
Skirt Settings
Line count controls how many skirt loops print. More loops prime more material and provide a longer inspection path; begin with the tested profile and add loops only for a defined flow or inspection need.
Skirt distance is the gap to the part. Set it wide enough that the loop does not touch the first layer while preserving usable build-plate area.
Brim Settings
Brim width first, in millimetres or in line count depending on the slicer. Start moderate. Widen only after a reslice shows the corner still lifting.
Begin with the printer’s validated brim profile. If the edge is excessively difficult to remove, test the slicer’s smallest practical gap increase on a small model, reslice, and confirm that the brim still provides the required contact.
Raft Settings
Base layers are the thick slow foundation on the plate. Top layers are the smooth surface the model starts on. Extra margin sets the reach past the part. Three settings, three jobs.
Then check the air gap, sometimes labelled separation distance. Too small a gap can make the raft difficult to remove; too large a gap can weaken contact with the model. Adjust in small steps and test on a compact part using the printer and slicer guidance.
|
Setting |
What it controls |
Beginner starting point |
|
Skirt line count |
Number of loops, and how much plastic gets primed |
Use the tested profile; add or remove loops only for a defined priming or inspection need. |
|
Skirt distance |
Gap between the loop and the part |
Wide enough not to touch the part. Reduce only when the available plate area requires it. |
|
Brim width |
How far the brim reaches out from the base |
Moderate. Increase in steps only if lifting continues. |
|
Brim line count |
The same control expressed in nozzle passes |
Use whichever your slicer exposes. Not both. |
|
Brim distance |
Gap between brim and first layer |
Use the slicer's tested attached-brim setting; if removal is difficult, change only the documented separation control in small test steps. |
|
Raft base layers |
Thick bottom layers touching the plate |
Leave at the stock profile value. |
|
Raft top layers |
Smooth surface the model prints on |
Use the tested profile, then inspect the raft surface before changing layer count. |
|
Raft extra margin |
How far the raft extends past the part |
Use the tested profile and confirm the complete footprint in preview before reducing the margin. |
|
Raft air gap |
Distance between raft top and model bottom |
Use the tested profile; if removal or contact fails, adjust in small documented increments and test a compact part. |
|
Look at the preview before you printSlice the file and inspect the first layers on screen. A brim should touch the model; a skirt should not. For a raft, check the full footprint and the layers below the part. Comparing the slicer's time and filament estimates for all three options shows the trade-off for that specific model without promising a universal saving. |
START WITH THE MODEL AND FIRST LAYER. MANY BEGINNER ADHESION PROBLEMS COME FROM AN UNSTABLE FOOTPRINT, A DIRTY PLATE, OR AN ORIENTATION THAT DOES NOT SUIT THE AVAILABLE BUILD AREA. A BEGINNER 3D PRINTER SETUP SHOULD MAKE THE FIRST LAYER EASY TO INSPECT AND THE MODEL EASY TO REORIENT BEFORE EXTRA ADHESION MATERIAL IS ADDED.
Fix the Setup Before You Fix the Slicer
Rafts bury first-layer faults. They do not repair them. Worth separating those two things.
Run these five checks before adding more adhesion material. They help separate plate preparation, nozzle gap, profile, drafts, and orientation problems from a genuine need for a brim or raft.
- Clean the plate. Dust, fingerprints and skin oil all cut grip, and a plate that looks clean often is not. Use whatever the plate maker recommends, then keep fingers off the print area.
- Levelling next, manual or automatic. The nozzle should sit the same distance above the plate everywhere. Uneven extrusion across the bed is the tell. Look for it early.
- Z offset. Too high and the plastic rests loosely on the surface. Too low and it smears. Small steps. One first layer watched after each change.
- First-layer speed and temperature should favor reliable placement over pace. Change one value per test print so you can identify which adjustment helped.
- Reorientation adds no material cost. A rounded or awkwardly placed base may give the plate very little contact, and rotating the part can reduce the need for an adhesion aid.
Auto-leveling can reduce manual bed-adjustment steps, but a responsible adult still needs to follow the current manual for plate condition, cleanliness, Z-offset or calibration checks, profile selection, and first-layer monitoring.
|
Two safety notes for family and classroom setups Hot surfaces stay hot. The nozzle and, on machines that have one, the heated bed both reach temperatures that will burn. Let a print cool fully before anyone reaches in to peel a brim or pry a raft. Ventilation still counts. CDC and NIOSH guidance on 3D printing in schools, libraries and makerspaces recommends running printers in well-ventilated space and keeping the nozzle and build platform clean between jobs. Both habits happen to help your first layer as well. |
Removing a Brim or Raft Without Wrecking the Model
Cool it first. Warm plastic bends where you do not want it to. A warm brim tears instead of peeling.
A cooled brim usually comes away by hand. Slivers stay behind at the edge. A deburring tool, flush cutters, a hobby knife or a light pass of sandpaper will take those off. Cut away from the fingers. Blade work stays with an adult.
A brim that is unusually difficult to remove can indicate an unsuitable gap, excessive first-layer compression, or a material/profile mismatch. Adjust only the setting documented by the slicer or printer, use a small test, and keep changes incremental.
Rafts need a different motion. Bend from one corner and let the air gap do the work. Thin spatula or tweezers on delicate parts. Slowly around anything narrow, because raft removal is where thin features snap.
A raft can leave the underside rougher because the model begins on printed material rather than directly on the plate. Sand or finish only when the project requires it, and keep blades and powered tools under appropriate adult control.
When to Add More Grip, and When to Stop
Two lists. The first says the aid is the answer. The second says it is a distraction.
Add more adhesion help when
- Plate is clean, offset is right, and one specific corner is still lifting.
- The model has a genuinely small or unstable contact patch and cannot be reoriented.
- You are running a filament that shrinks hard, with room temperature under control.
- A brim held fine and the part still came away. That points at needing a new base, not a wider one.
- A compact test on a cleaned, inspected surface that remains within the plate manufacturer's service guidance; visible coating damage, gouges, or distortion require repair or replacement rather than more adhesion material.
Stop and fix something else when
- The skirt itself came out patchy. Nozzle, offset or plate, not an adhesion-aid problem.
- The brim lifted along with the model. More plastic will not hold plastic that is not sticking.
- If different models fail in the same area and in the same way, suspect a shared setup, profile, mechanical, environmental, or material issue before adding more adhesion material.
- A draft, an open window or an air-conditioning vent is blowing across the plate.
- Repeated raft use on simple PLA models is a reason to recheck plate condition, nozzle gap, temperatures, drafts, orientation, and the validated profile.
Conclusion
Symptom first. Then the aid.
Skirt for priming and a look at the first layer. Brim for edges that lift. Raft for a print that has already beaten a sensible brim. Paid for in filament, minutes and a textured bottom face.
Many beginner prints need only a skirt to confirm flow. Curling corners may justify a brim, while repeated failures on a clean, correctly prepared plate may justify a raft. If the first layer fails across many different models, investigate the setup rather than adding more adhesion material.
Before buying, compare printers by first-layer workflow, build plate type, supported materials, and how clearly the slicer explains skirt, brim, and raft settings. Verify the exact model’s current price, package contents, setup requirements, age and supervision guidance, warranty, return terms, and availability on the manufacturer’s regional product page and manual before purchase.
FAQs
What is the difference between a skirt, a brim, and a raft?
A skirt is a detached loop used to prime flow and inspect the first layer. A brim attaches to the model's edge to add bed contact, while a raft creates a separate platform under the entire model.
When should a beginner use a brim?
Use a brim when the plate is clean and correctly set up but a small footprint, tall narrow shape, or lifting corner still needs more contact. If the brim also lifts, fix the plate, nozzle gap, temperature, or draft before adding more material.
Does a raft prevent all warping?
No. A raft can create a more forgiving base, but it cannot correct every cause of warping.
- A dirty or poorly prepared build surface
- Incorrect first-layer height or temperature
- Strong drafts or uneven cooling
- A model orientation with too little stable contact
Can a skirt improve bed adhesion?
Not directly, because the skirt does not touch the model. It helps indirectly by revealing flow and first-layer problems before the printer reaches the part.
- Continuous extrusion around the loop
- Even line width across the plate
- A nozzle gap that is neither round and loose nor heavily smeared
How do I remove a brim or raft safely?
Let the build surface cool, remove the part according to the plate maker's instructions, and keep sharp tools under adult control.
- Flex or lift the plate only as the manufacturer allows.
- Peel a brim outward in short sections rather than twisting the model.
- Separate a raft gradually at the designed gap.
- Trim or sand remaining edges away from fingers and moving joints.
Which option uses the least extra filament?
A skirt usually uses the least because it is only a few one-layer loops. A brim uses more but stays thin; a raft normally uses the most because it covers the full footprint with multiple layers.
Sources
- National Institute of Standards and Technology, “Material Extrusion”
- National Library of Medicine (PMC), “Establishing a Framework for Fused Filament Fabrication Process Optimization: A Case Study with PLA Filaments”
- National Library of Medicine (PMC), “Optimizing Fused Filament Fabrication Process Parameters for Quality Enhancement of PA12 Parts Using Numerical Modeling and Taguchi Method”
- National Library of Medicine (PMC), “Optimisation of the Adhesion of Polypropylene-Based Materials during Extrusion-Based Additive Manufacturing”
- Centers for Disease Control and Prevention / NIOSH, “Approaches to Safe 3D Printing: A Guide for Makerspace Users, Schools, Libraries, and Small Businesses”
- Xometry, “Skirt vs. Brim vs. Raft in 3D Printing – A Comparison”




Further reading

STEM Building Toys for Kids: Blocks, Kits and Printers Compared

Toy 3D Printer: What to Look for in a Printer That Makes Toys at Home

Personalized Gifts for Kids: Name Tags, Keepsakes and Custom Toys You Can Design